You are using an out of date browser. It may not display this or other websites correctly.
You should upgrade or use an alternative browser.
You should upgrade or use an alternative browser.
Diy fondant and gumpaste recipes
- Thread starter Akos
- Start date
- Joined
- Jun 22, 2017
- Messages
- 4,067
- Reaction score
- 2,081
Hello everyone. Do you buy your fondant and gumpaste or you make them yourself. If you make them yourself, any help on the recipes ? Thanks
There are good quality fondants and gumpastes available commercially. Consistency is the biggest issue; a commercially produced product will be very consistent in quality.
But if you want to make your own I would recommend Toba Garrett’s recipe. Just google her a few bloggers have posted her recipes.
If you’re going to purchase I would recommend Fat Daddios. For a professional quality fondant Carma Massa Ticino or Mona Lisa by Callebaut. With professional quality fondant you get superior handling and durability as these fondants are formulated for higher humidity conditions.
I wouldn’t waste my time or money on Wilton.
- Joined
- Jun 22, 2017
- Messages
- 4,067
- Reaction score
- 2,081
I have a question please. After covering a wedding cake with fondant, do I wait a while (how long) for the fondant to be dry to fix the petal ruffles or I should go ahead to fix the petal ruffles. I'm doing an ombre decoration
I’ve always attached the decorations as soon as it’s covered and never had a problem. The temperature of the cake is important. If the cake filling requires refrigeration, set your refrigerator to 40°F (4°C). Colder will cause a lot of condensation to form on the crumb coasting, which can cause the fondant to degrade.
Since you are new to fondant, you may not be aware that air bubbles and bulges often develop underneath the fondant hours after the cake is covered and fully decorated. If a cake develops air bubbles and bulges underneath the fondant there is absolutely no way to fix it.
These bubbles and bulges can be prevented by properly prepping the cake before covering it in fondant.
It’s a 3 day process.
- Day 1: bake cakes and rest overnight to allow the crumb to settle.
- Day 2: 24 hrs after baking, torte and fill the cake. Regardless of the type of filling, you must dam each layer before filling. The dam serves two purposes: 1) keeps the filling from oozing out the sides from between the layers as the weight of the cake compacts the layers. 2) keeps any trapped air bubbles in the filling from getting pushed out between the layers from the weight of the cake as it sits. Oozing filling and air pockets in the filling layer are the causes of the dreaded side bulges in both buttercream covered cakes and fondant cakes.
- After cake is dammed, filled, and crumb coated insert a lollipop stick down the center on the entire cake tier and gently wiggle it to very slightly expand the opening. Pull out the lollipop stick and discard. Store cake overnight to allow time for trapped gas to escape
- Day 3: cover on fondant and decorate
During baking the leavening creates gas bubbles; the gluten network traps them. As a decorated cake sits, gravity and the weight of the cake and decorations slowly begins to compact the cake and those trapped air bubbles are pushed out of the cake layers.
The air bubbles in the cake will find the path of least resistance. By creating a small opening in the center of a dammed, filled, and crumb coated cake you provide an opening for the gas to escape.
- Joined
- Jun 22, 2017
- Messages
- 4,067
- Reaction score
- 2,081
I really really appreciate your post. So detailed. Thank you very much.
You're welcome. I forgot to add you need to take precautions in the container used to refrigerate a cake once its covered in fondant to prevent condensation. The link below will explain how to box the cake for refrigeration.
http://ericaobrien.com/blog/yes-you-can-and-sometimes-should-refrigerate-your-fondant-covered-cakes/
I’ve always attached the decorations as soon as it’s covered and never had a problem. The temperature of the cake is important. If the cake filling requires refrigeration, set your refrigerator to 40°F (4°C). Colder will cause a lot of condensation to form on the crumb coasting, which can cause the fondant to degrade.
Since you are new to fondant, you may not be aware that air bubbles and bulges often develop underneath the fondant hours after the cake is covered and fully decorated. If a cake develops air bubbles and bulges underneath the fondant there is absolutely no way to fix it.
These bubbles and bulges can be prevented by properly prepping the cake before covering it in fondant.
It’s a 3 day process.
- Day 1: bake cakes and rest overnight to allow the crumb to settle.
- Day 2: 24 hrs after baking, torte and fill the cake. Regardless of the type of filling, you must dam each layer before filling. The dam serves two purposes: 1) keeps the filling from oozing out the sides from between the layers as the weight of the cake compacts the layers. 2) keeps any trapped air bubbles in the filling from getting pushed out between the layers from the weight of the cake as it sits. Oozing filling and air pockets in the filling layer are the causes of the dreaded side bulges in both buttercream covered cakes and fondant cakes.
- After cake is dammed, filled, and crumb coated insert a lollipop stick down the center on the entire cake tier and gently wiggle it to very slightly expand the opening. Pull out the lollipop stick and discard. Store cake overnight to allow time for trapped gas to escape
- Day 3: cover on fondant and decorate
During baking the leavening creates gas bubbles; the gluten network traps them. As a decorated cake sits, gravity and the weight of the cake and decorations slowly begins to compact the cake and those trapped air bubbles are pushed out of the cake layers.
The air bubbles in the cake will find the path of least resistance. By creating a small opening in the center of a dammed, filled, and crumb coated cake you provide an opening for the gas to escape.
In your to me, you spoke about damming the cake. How is that done ? I've never heard of the word in cake work. Can you please explain further ?
- Joined
- Jun 22, 2017
- Messages
- 4,067
- Reaction score
- 2,081
Thanks for the link. However the site has stepped out for a bit
Hi Akos,
Oh dear, when I copied the link her site was up. I hope she’s just updating her website and not shutting down.
These are the things you need to know about refrigerating a cake that’s been covered in fondant.
Make sure the brand fondant you use is formulated for higher humidity. I don’t know what brands are available in South Africa so I can’t suggest brands. But the shop where you purchase your cake supplies should be able to guide you.
The night before you refrigerate your cake set your refrigerator to 40°F (4.4°C). Any colder will increase risk of condensation forming on your cake.
Select a heavy corrugated cardboard shipping box slightly larger than your cake. You want as little space between the box and cake as you can possibly manage. The less air space around the cake when it’s refrigerated the better. Just make sure though it’s large enough for you to easily slide the cake in and out.
Select a cake board larger than your cake, but one that fits in the box when it’s turned on it’s side.
Watch the video link below to look at the order of closing the flaps. This is very important. Test to make sure your cake board is large enough to prevent the flaps from folding into the box.
Locate the side seam on the box. See pic. Place the box on the counter with that seam facing the ceiling. That seam is the weak spot. You will reinforce it with tape, but you do not want the cake sitting on that seam.
The box should be on its side, seam up, and flaps of the box will be the front and back.
Tape all of the seams and edges with strong packing tape. The video does not show this because that box is only being used to transport the cake. When you refrigerate a cake you need to make sure that you tape up all the box seams, flaps and corners to keep air and moisture out. Anywhere the flaps fold over each other you need to tape.
Reinforce the back flaps with tape as shown in the video.
Place a large piece of non-slip mat in the box then place your cake on top of it.
Close the flaps in the order shown on the video. Remember if you close the flaps in the wrong order they will fold inward and into your cake.
Tape up all the seams and corners of front flaps and reinforce just as you did with the backflips.
The heavier the cardboard the better as the cardboard is going to absorb the moisture well the cake is in the refrigerator. Do not use a flimsy uncorrugated bakery box as the moisture will seep though.
This is the side seam. Flip the box so this seam is facing the ceiling
The side seam needs to face up. Then tape it
- Joined
- Jun 22, 2017
- Messages
- 4,067
- Reaction score
- 2,081
In your to me, you spoke about damming the cake. How is that done ? I've never heard of the word in cake work. Can you please explain further ?
Damming the layer is creating border of butter cream on the outside edge of the cake layer. It will hold the filling in. End it doesn’t matter if you’re using just plain buttercream or if you’re using some other feeling you have to dam your cake
Place the cake layer on a cake board. Place on the cake turn table if you have one. I actually torted (divided) this layer, I just don’t have a photo of it after I sliced it.
Use a plain round tip to pipe a thick ring of buttercream around the edge. I don’t have a photo of it but in side that ring pipe in your filling. That ring will keep the filling from oozing out. Trust me if you do not damn the layers the filling will definitely lose out and distort the shape of your cake.
I press down on each layer as I dam, fill, and stack to force a little of the buttercream out. This will help seal the damn to the outer layer of buttercream. This was a test cake so it was a buttercream filling
I do not use a crumb coat as I use icing guides. I use a large flat tip to pipe thick layer of buttercream on the sides
Smooth out the sides. Make sure the cake is level.
Another reason to pipe the dam is it helps create a more uniform layer of filling. How a cake looks sliced and plated is very important. There’s a lot of bakers out there that do a terrible job in filling and stacking. This was just a test cake, a recipe I was developing. But you see I still take care to make sure the cake is presentable when sliced and plated.
- Joined
- Jun 22, 2017
- Messages
- 4,067
- Reaction score
- 2,081
These are not my cakes—they are examples of very poorly staked cakes. Most of the cake layers are too thick. There is way too much filling. These cakes do not look appetizing. Sliced and on a plate thses cakes do not look like the work of professional baker. Yet the baker claims she is a professional.
These images come from her tutorial on filling and stacking—she’s actually teaching bakers to do this poor quality work.


These images come from her tutorial on filling and stacking—she’s actually teaching bakers to do this poor quality work.
- Joined
- Jun 22, 2017
- Messages
- 4,067
- Reaction score
- 2,081
I’m glad you find my post helpful. I am very passionate about baking, and can talk about it all day.
I thought about creating a baking blog. But the Internet is just over run with baking blogs, the world really don’t need another baker’s blog. But if ever you have any questions or just want to share your latest creation do post!
Of late I’ve been focusing my energy towards creating a coffee shop and bakery. My brother is an artisan coffee roaster,I’m a baker, so we would like to combine our food passions and skills into a retail business.
Would you mind sharing your recipe this cake is gorgeous?Damming the layer is creating border of butter cream on the outside edge of the cake layer. It will hold the filling in. End it doesn’t matter if you’re using just plain buttercream or if you’re using some other feeling you have to dam your cake
Place the cake layer on a cake board. Place on the cake turn table if you have one. I actually torted (divided) this layer, I just don’t have a photo of it after I sliced it.
View attachment 1754
Use a plain round tip to pipe a thick ring of buttercream around the edge. I don’t have a photo of it but in side that ring pipe in your filling. That ring will keep the filling from oozing out. Trust me if you do not damn the layers the filling will definitely lose out and distort the shape of your cake.
View attachment 1753
I press down on each layer as I dam, fill, and stack to force a little of the buttercream out. This will help seal the damn to the outer layer of buttercream. This was a test cake so it was a buttercream filling
View attachment 1756
I do not use a crumb coat as I use icing guides. I use a large flat tip to pipe thick layer of buttercream on the sides
View attachment 1752
Smooth out the sides. Make sure the cake is level.
View attachment 1757
Another reason to pipe the dam is it helps create a more uniform layer of filling. How a cake looks sliced and plated is very important. There’s a lot of bakers out there that do a terrible job in filling and stacking. This was just a test cake, a recipe I was developing. But you see I still take care to make sure the cake is presentable when sliced and plated.
View attachment 1759
View attachment 1758
- Joined
- Jun 22, 2017
- Messages
- 4,067
- Reaction score
- 2,081
Would you mind sharing your recipe this cake is gorgeous?
It’s a chiffon cake with Italian meringue buttercream. This specific chiffon cake base took over 100 hrs to develop. It’s part of a book project, so I am not distributing it at this time.
The Italian meringue buttercream is just a standard buttercream. For the inlay, I iced the cake in white. Chilled it until the buttercream was solid. Then heated cookie cutters to cut out designs in the buttercream. I then filled in the designs with contrasting colors of buttercream and re-chilled the cake to set the buttercream.
I did post the standard ratios for chiffon cake on other threads.
Bake at 325°F
Uncoated metal cake tin is recommended
Cloth baking strip is recommended
Heating core is recommended see link below
Do not grease the cake tin
Line with parchment circle
Cool upside down
| Chiffon Cake DO NOT GREASE YOUR CAKE TIN | Baker’s Percentages This is the formula | 8” test cake - this would “recipe” |
| cake flour | 100% | 113g |
| leavening (normally baking powder) | 3.5% | 4g |
| fine salt | 1.5% | 1.5g |
| sugar #1 | 90% | 102g |
| citrus zest | ||
| vegetable oil | 50% | 56ml |
| egg yolk | 50% | 56ml |
| water* | 60% | 68ml |
| vanilla extract | 2.5% | 3ml |
| egg whites, 68°F | 100% | 113ml |
| sugar #2 | 40% | 45g |
| cream of tartar | 0.03% | 3.3 |
*water can be substituted with any similar liquid (sparkling water; combination of sparkling water and juice; cordial and sparkling water; Champagne; non-alcoholic champagne or wine, etc)
Example of heating core
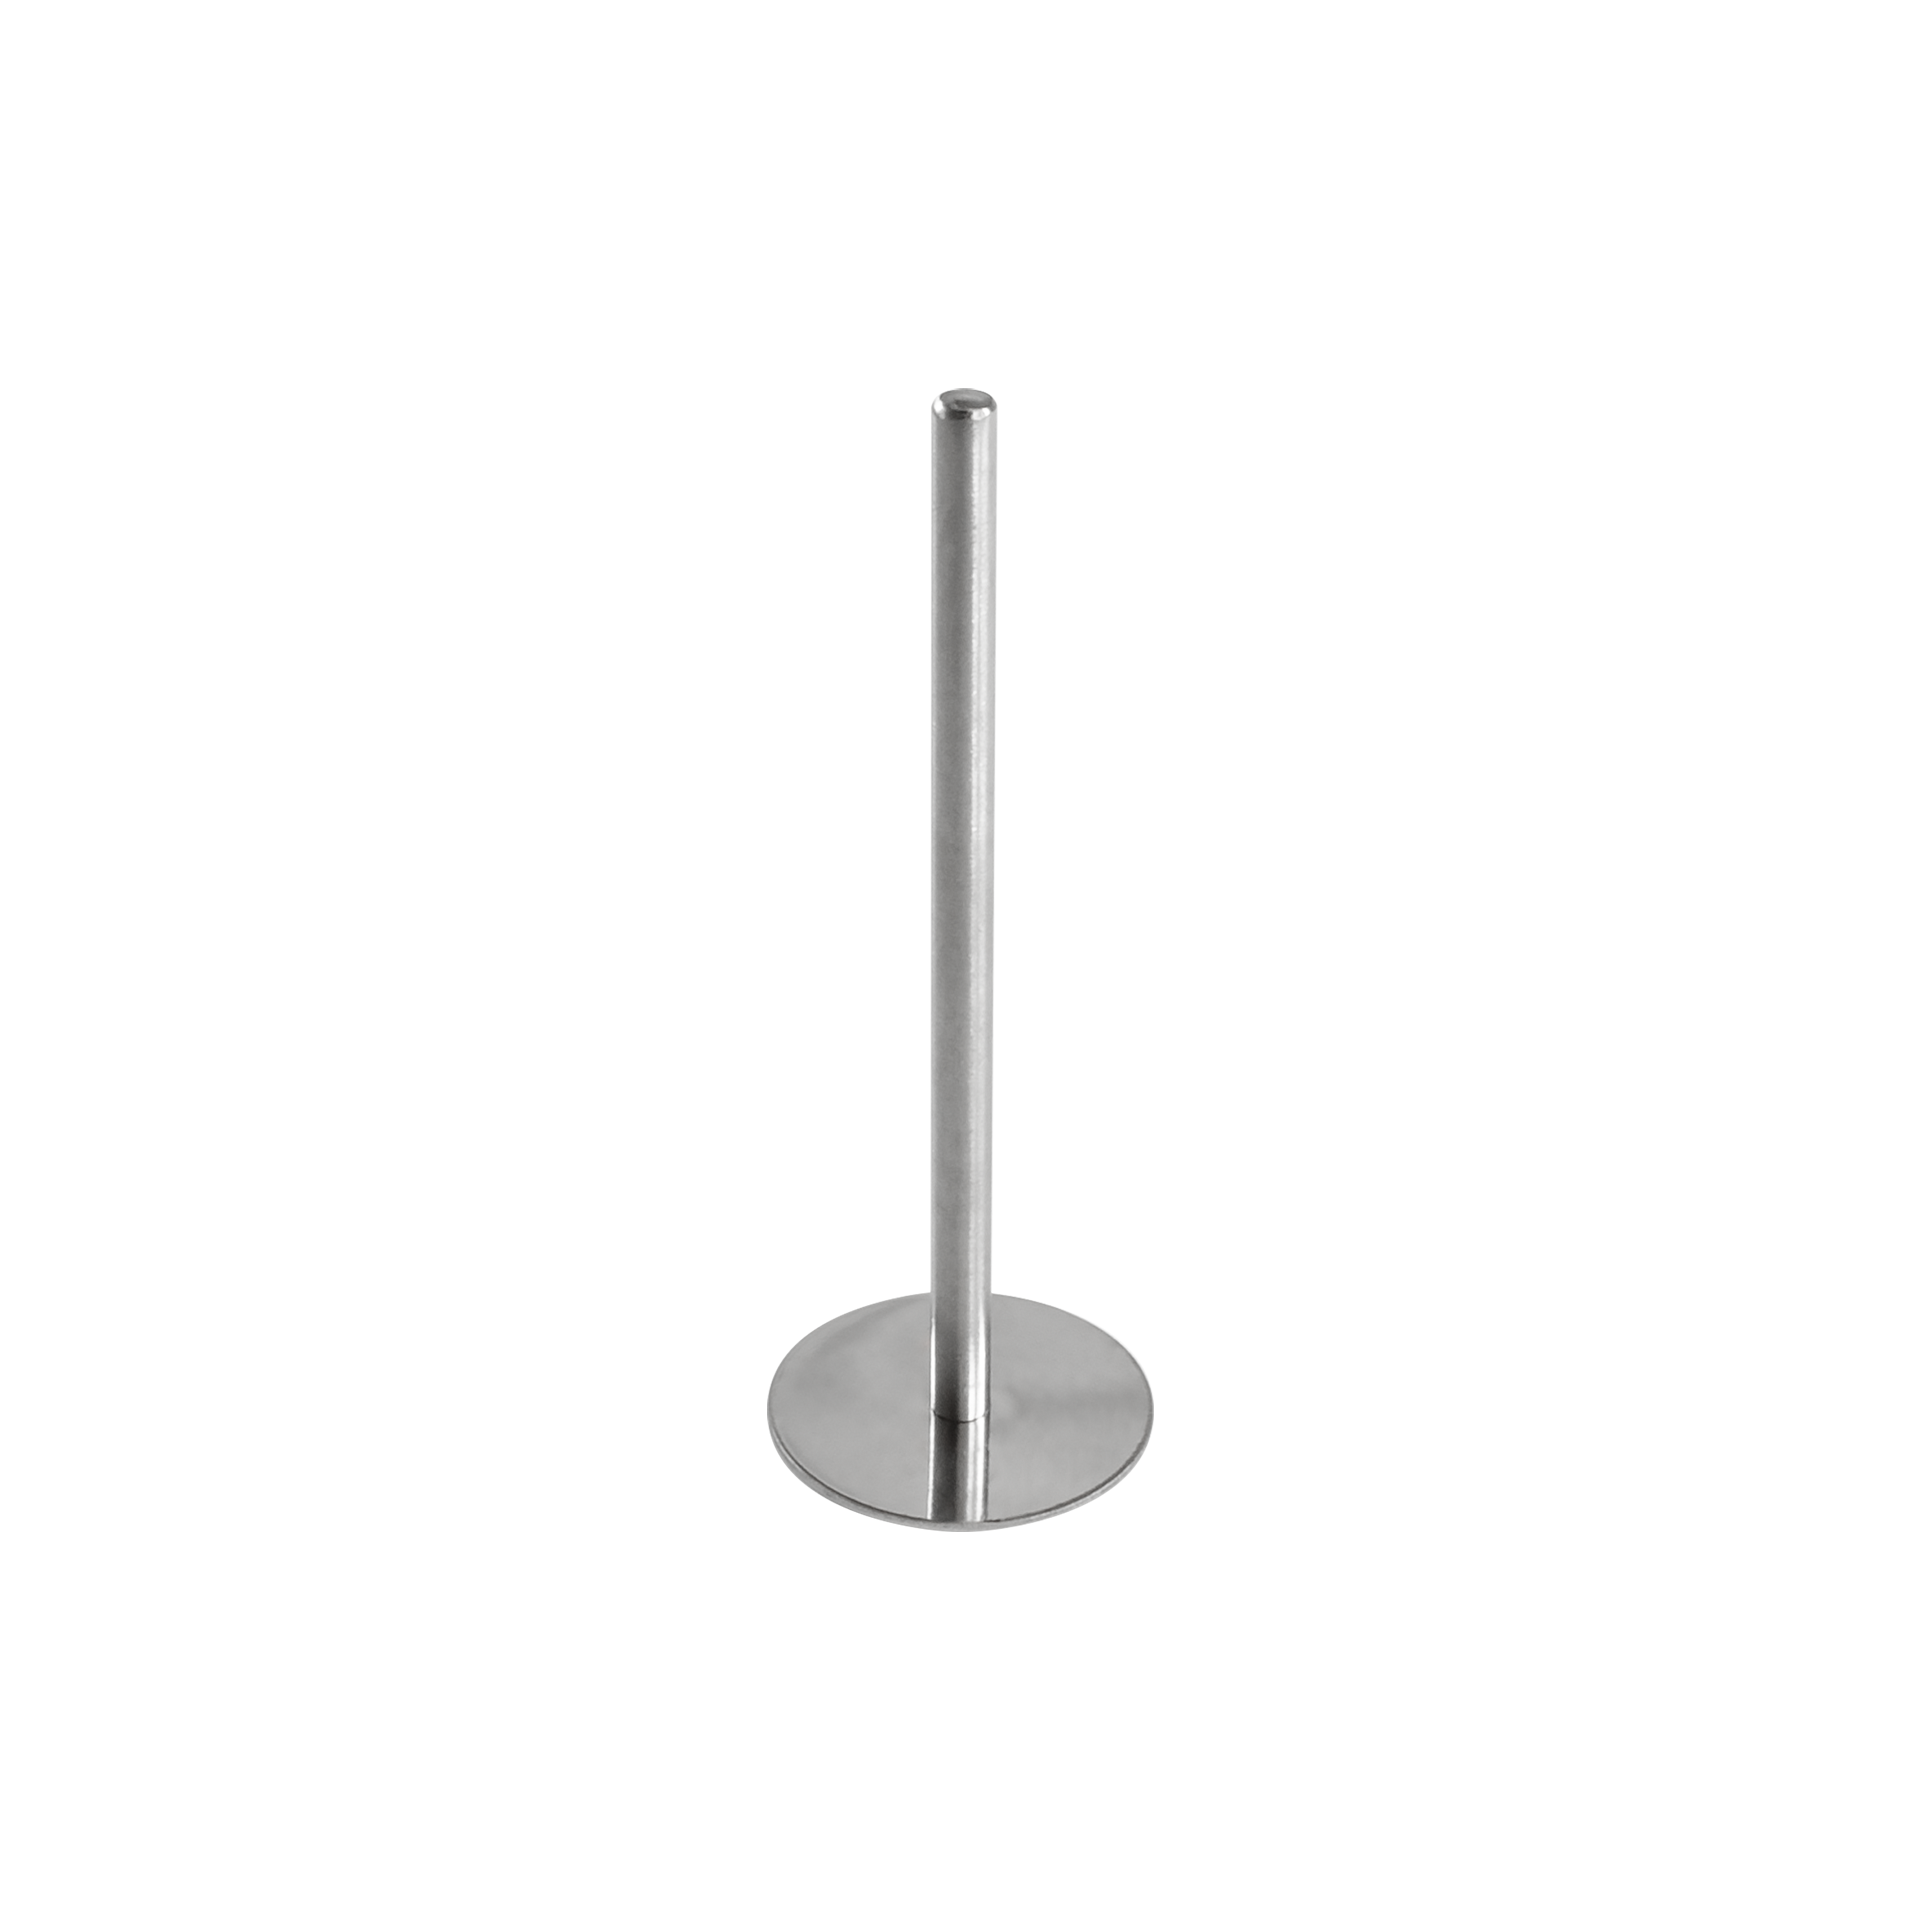
Heating Rod - Fat Daddio's
 fatdaddios.com
Ask a Question
Want to reply to this thread or ask your own question?
You'll need to choose a username for the site, which only take a couple of moments. After that, you can post your question and our members will help you out.
Similar Threads
Forum statistics
Latest Threads
-
Identifying Food Packaging Containing PFAS
- Started by EdwardGuerra
-
Paper Grade for Perfect Food Packaging
- Started by Steelman
-
Vacuum Dough Question
- Started by am123
-
Hey can i make this cake batter into pancakes in a pan instead of baking?
- Started by TolueLangdon213
-
Baking Stone vs. Steel: Which one is worthier?
- Started by arcane-luxury
-
Why don't supermarket cakes have that familiar scent anymore?
- Started by SupermarketCake
-
Pie Crust Fluting & A Good "Shortbread" Crust
- Started by hummingbirdpieco
-
Oh, hello!
- Started by hummingbirdpieco
-
Making a sourdough starter, liquid on the top
- Started by dwdanby
-
High Ratio Shortening for Cookies
- Started by john.c1993