Pate a choux revisited

Joined
Jun 22, 2017
Messages
4,067
Reaction score
2,081
I did a test before I found out about the oil coating technique, changing from greased + floured pan to silicone mat, but it didn't make any significant difference. I haven't had a change to test silicone vs. parchment with the oil coating but I've seen most people use silicone anyway. Or more specifically Silpain is preferred, but no way I'm shelling out the money for that right now lol.

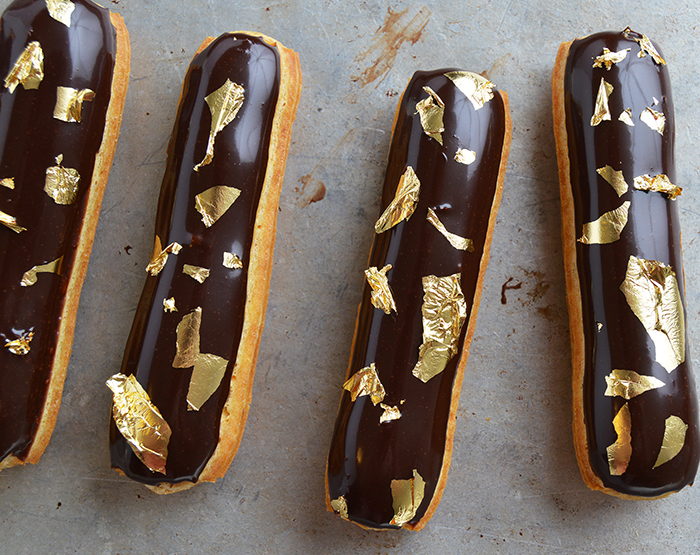
I piped these with an Ateco 868 tip (second largest in their line of French tips), about 5" long. Baked at 350°F for 45 minutes, then cracked the oven door open with a wooden spoon and lowered to 300°F to bake for another 15 minutes. After they cooled, I noticed they were still too soft so popped them in a 375°F oven (it was already on baking something else) for another 5 minutes, but even that wasn't enough.

Next time I'm thinking of trying 350°F for 45 minutes, then 300°F for 15 minutes, then crack open the oven door and bake at 300°F for another 10-15 minutes to dry out. Since the oil+powdered sugar seems to make them brown more than just powdered sugar, I'm hesitant to bake at the higher temperature for longer as the ridges might get too dark.

Something else I did differently to help with piping was letting the choux paste cool down first. The batch that I make (scaled to 100g flour) is just enough to comfortably fit into an 18" pastry bag, so I transferred it all to the bag after I finished making it and popped it in the fridge for 30 minutes. I find the cooled paste, being less sticky and runny, makes it easier to cleanly cut off the ends when piping.


Why do you feel like you need to vent the oven? Did something specifically cause you to use that technique? I’ve never tried the venting. Do you feel like you get a crispier shell by venting?

Have you tried Pierre Herme‘s recipe? He preheats high; turns the oven off for the first 10 mins of baking; then turns it back on at a lower temp. After of which he cracks the door.

I’ve never made it, but I’ve used his craquelin, which is just his sweet tart dough, for my puffs.

Pate a choux

Pierre Herme


For Pate a Choux:

125 ml still mineral water

125 ml whole milk

5g baker’s sugar

5g fleur de sel de Guerande or other fine sea salt

110g unsalted butter

140g AP flour

250g eggs


Note oven will be preheated to 400°F (200°C). Oven will be turned off at the beginning of the bake, then turned it back on at 350°F (170°C)


Preheat oven to 400°F (200°C)

Line a baking sheet with parchment paper

In a saucepan bring still mineral water, milk, sugar, salt and butter to a boil.

Add the flour all at once. Beat well until the paste is smooth and shiny and pulls away from sides of pan.

Transfer the paste to a bowl and best in eggs one by one.

Transfer to a piping bag fitted with small-toothed #BF 18 pastry tip.


Pipe fluted cylinders of dough about 6 inches (15 CM) long on the lined baking sheet, leaving space between them for expansion. Place the baking sheet in the oven and immediately turn oven off. About 10 minutes turn the oven back on set it at 350°F (170°C) and continue baking the eclair shells for 10 minutes.

After 10 minutes, wedge the oven door partly open with a wooden spoon and continue baking for about 10 minutes more.

When the eclair shells are done remove them from the oven and transfer to a wire rack to cool.


==========================

Craquelin for 12 - 14 puffs

150g unsalted butter
95g confectioners’ sugar
30g almond flour
2 pinches fleur de sel de Guerande or other fine sea salt
1/4 vanilla bean
50g egg
250g AP flour

In a food processor fitted with the dough blade, process the butter and till creamy. Sift confectioners sugar into the butter then add the almond flour and salt. Split the vanilla bean lengthwise and scrape the seeds into the mixture. Add the egg. Sift the flour and process just until the dough forms a ball.

Roll between plastic sheets to 1/16” thick. Place on baking sheet in freezer for 20 minutes.

Cut into 2“ - 21/2“ rounds. Place a disc on round of piped choux. Bake as above.


There’s a photo of a puff with this craquelin on the first or second page if you want to see how it bakes up.
 
Joined
Feb 12, 2020
Messages
257
Reaction score
121
@Norcalbaker59 I'm trying with opening the oven door for the last bit since I see a lot of other recipes do that for their baking method. I figure since it should dry the shells out faster than if I didn't vent, it offers the best middle ground between simply baking for longer (might burn them) vs. leaving shells in the turned-off oven or really low temperature oven to finish drying (takes too long).

I haven't tried Pierre Hermé's recipe. I'm surprised that the bake time is so short, with a total of 30 minutes, considering the instructions call for 6" eclair shells, which are even larger than what I make.

I've also never seen a pâte sucrée dough used as a craquelin. How different is the texture from the basic butter-sugar-flour craquelin?

I also haven't gotten around to trying the freezing technique yet. It's actually next on my list of things to try with eclairs (the disk eclairs from Francisco Migoya are also really cool, but unfortunately I don't have any small tart rings nor any Silpains to cut up to get that beautiful texture), but I wanted to iron out my method for making eclairs the "classical" way of piping them individually before I tried that out.
 
Joined
Jun 22, 2017
Messages
4,067
Reaction score
2,081
@Norcalbaker59 I'm trying with opening the oven door for the last bit since I see a lot of other recipes do that for their baking method. I figure since it should dry the shells out faster than if I didn't vent, it offers the best middle ground between simply baking for longer (might burn them) vs. leaving shells in the turned-off oven or really low temperature oven to finish drying (takes too long).

I haven't tried Pierre Hermé's recipe. I'm surprised that the bake time is so short, with a total of 30 minutes, considering the instructions call for 6" eclair shells, which are even larger than what I make.

I've also never seen a pâte sucrée dough used as a craquelin. How different is the texture from the basic butter-sugar-flour craquelin?

I also haven't gotten around to trying the freezing technique yet. It's actually next on my list of things to try with eclairs (the disk eclairs from Francisco Migoya are also really cool, but unfortunately I don't have any small tart rings nor any Silpains to cut up to get that beautiful texture), but I wanted to iron out my method for making eclairs the "classical" way of piping them individually before I tried that out.

I tend to under bake because because Americans like things unbaked. They get freaked out when you put a proper bake on things, assuming it’s burnt. So I bake at a higher temperature for shorter time. So far I haven’t had a problem with the shells drying out. But I will probably try Hemes’ recipe the next go around just to give venting a try.

Tbh, I‘ve never actually eaten any of my eclairs because of the gluten thing. Only baked them. I first started baking pate a choux in like the 80’s. But only in the past few years tried the craquelin topping. I have to say I really like Hermes’ because it produces a really nice craggy texture. I think it is the addition of the almond flour. When all flour is used, it produces a finer craquelin.

You can cut them into strips. if you have an oblong cutter, use that, to make pieces to use on eclairs. Hemes adds a couple of drops of food color to the dough toward the end of mixing to give his puffs an artistic touch.

Here are a couple of all flour recipes if you want a smoother version craquelin.

==============================
Dorie Greenspan’s Craquelin

128g unsalted butter, 68°F
200g light brown sugar
pinch fine sea salt
170g AP flour
11/2 tsp vanilla extract

pulse butter, sugar and salt in food processor until just blended.

Add the flour and pulse until it is like moist curds.

Pulse in vanilla extract.

Scrape onto work surface and form a ball.

Divide in half, and form each into a disk.

Roll our each disk between parchment paper 1/8’ - 1/4” thick.

Freeze for at least 1 hour.

Cut into 1 3/4” - 2” circles. Freeze until needed


==================================================

This is Chef Amaury Guichon‘s puff with a red craquelin. You can see his all flour craquelin produces a texture, but it is tighter than the almond flour and flour mix that Hermes’ uses.

Guichon’s recipe assumes you know how to do do everything, so not many instructions. q.s. is latin for quantum satis; it’s actually used in the medicine for prescriptions, meaning “as much as is sufficient”

red craquelin
  • 210 g all-purpose flour
  • 200 g brown sugar
  • q.s. red color
  • 160 g butter
Make a crumble with all the ingredients, then sheet it thin.

pâte à choux
  • 250.45 g milk
  • 250.45 g water
  • 10.04 g sugar
  • 10.04 g salt
  • 275.89 g all-purpose flour
  • 200.89 g butter
  • 502.23 g eggs
In a pot, boil the milk, water, sugar, salt and butter together. Add the flour sifted progressively, then the eggs with a whisk. Pipe the dough in a dome, add the pâte à choux crust on top and bake it at 195°C/383°F for 25 minutes.

candied strawberry
  • 108 g sugar
  • 24 g glucose
  • 12 g lemon juice
  • 36 g strawberry puree
  • 24 g cranberry juice
  • 1 u vanilla bean
  • 4 g pectin NH
  • 300 g fresh strawberry
Cook the strawberry puree, cranberry juice, sugar, glucose and pectin to 108°C/226°F, then cook the strawberry a little and add the lemon juice. Cool down immediately.

raspberry pastry cream
  • 750 g raspberry puree
  • 75 g sugar
  • 75 g yolks
  • 30 g pastry cream powder
  • 150 g cream
Boil the raspberry puree. Mix the sugar yolk and pastry cream powder then boil both for a minute, when cold add the wipped cream.

mascarpone whip
  • 6 g powdered gelatin (knox)
  • 28 g water
  • 96 g sugar
  • 96 g cream
  • 288 g mascarpone
  • 480 g cream
  • 2 u vanilla bean
Hydrate gelatin with water. Heat first cream, sugar and infuse with vanilla beans for 30 min. Add gelatin to infused cream and pour over mascarpone and burr mix. Combine with last cream and burr mix again, strain and chill overnight.

Decor
  • q.s. fresh strawberry
Montage
Fill your puff pastry with the raspberry pastry cream then insert the strawberry compote in it.
Glue both choux with a little bit of Mascarpone whipped cream, then nicely pipe all around the choux add the fresh fruit decor and chocolate decor.


241786F3-977B-43E0-BD25-553C025B0BD8.jpeg
 
Joined
Feb 12, 2020
Messages
257
Reaction score
121
@Norcalbaker59 It's been a while, but I finally got around to trying the freezing technique. It was pretty straightforward, just piped in strips, sprayed with non-stick spray, froze, cut into desired lengths (13 cm/5 inches), then stored in bags. When I needed them, I arranged the shells onto baking trays and let thaw to room temperature before baking.

The pate a choux recipe I've been using is still Francisco Migoya's. I follow it mostly exactly except for not using a baking steel, and I bake for 10 minutes longer than him.

Compared to the eclair shells using the exact same recipe but piped individually, I haven't been able to tell any difference. They rise to the same size, no cracks on the sides, etc. I will say that I'm not a fan of the flat squared-off ends, I still prefer the shells piped individually. It's completely personal preference in aesthetics, but I like a neat curved glaze on the ends of the eclair, and it's hard to get that when the shell itself is flat and not curved on the ends.

IMG_20210327_171743[1].jpg


IMG_20210327_210127[1].jpg


While we're on the topic of pate a choux, I'm still not completely happy with my current results. My eclair shells have good volume, no cracks, and no collapsing now, BUT the ridges (from using a French pastry tip) are very pronounced; they stick out a lot. You can notice that in the first picture above of the unglazed shells. It makes it much harder to glaze the shells cleanly when they stick out so much, and they may show through the glaze even if the glaze is fairly thick.

Below is another batch I made using the same recipe (piped individually, not frozen), but dropped the eggs to 133.33% instead of 166.67%. It's more clear out much the ridges stick out of the shell.

IMG_20210326_161842[1].jpg


What would possibly be causing that? The picture above with reducing the eggs to 133% was an attempt at fixing this problem, but it made no difference in the ridges and just ended up with smaller shells. I also tried baking at an initial lower temperature (375°F instead of 400°F), but that didn't do anything either. I figure that I probably want to keep:
  • Spraying the shells with non-stick spray
  • Using a French pastry tip
Since those are how I get crack-free shells, even if getting rid of them would solve this specific problem with the ridges. Since I'm happy with everything else about the shells, just the ridges that are the problem, I'm hesitant to change too much. What else do you think contributes to this problem?

Would increasing the percentage of butter (from 67%) help? My intuition is that the pronounced ridges are caused by the shell setting too quickly (hence my initial attempts at decreasing the eggs and using a lower baking temperature), so maybe increasing the fat will fix it?

Another point is that the flour strength that Chef Migoya uses is very low, as he uses cake flour (let's say around 8% protein). Most people use equivalents of AP and/or bread flour, so in the 10.5-12% protein range. However increasing the flour strength would also be counterproductive if my intuition above (that the shells are setting too soon) is correct. What are your thoughts?
 
Joined
Jun 22, 2017
Messages
4,067
Reaction score
2,081
@Norcalbaker59 It's been a while, but I finally got around to trying the freezing technique. It was pretty straightforward, just piped in strips, sprayed with non-stick spray, froze, cut into desired lengths (13 cm/5 inches), then stored in bags. When I needed them, I arranged the shells onto baking trays and let thaw to room temperature before baking.

The pate a choux recipe I've been using is still Francisco Migoya's. I follow it mostly exactly except for not using a baking steel, and I bake for 10 minutes longer than him.

Compared to the eclair shells using the exact same recipe but piped individually, I haven't been able to tell any difference. They rise to the same size, no cracks on the sides, etc. I will say that I'm not a fan of the flat squared-off ends, I still prefer the shells piped individually. It's completely personal preference in aesthetics, but I like a neat curved glaze on the ends of the eclair, and it's hard to get that when the shell itself is flat and not curved on the ends.

View attachment 4108

View attachment 4109

While we're on the topic of pate a choux, I'm still not completely happy with my current results. My eclair shells have good volume, no cracks, and no collapsing now, BUT the ridges (from using a French pastry tip) are very pronounced; they stick out a lot. You can notice that in the first picture above of the unglazed shells. It makes it much harder to glaze the shells cleanly when they stick out so much, and they may show through the glaze even if the glaze is fairly thick.

Below is another batch I made using the same recipe (piped individually, not frozen), but dropped the eggs to 133.33% instead of 166.67%. It's more clear out much the ridges stick out of the shell.

View attachment 4110

What would possibly be causing that? The picture above with reducing the eggs to 133% was an attempt at fixing this problem, but it made no difference in the ridges and just ended up with smaller shells. I also tried baking at an initial lower temperature (375°F instead of 400°F), but that didn't do anything either. I figure that I probably want to keep:
  • Spraying the shells with non-stick spray
  • Using a French pastry tip
Since those are how I get crack-free shells, even if getting rid of them would solve this specific problem with the ridges. Since I'm happy with everything else about the shells, just the ridges that are the problem, I'm hesitant to change too much. What else do you think contributes to this problem?

Would increasing the percentage of butter (from 67%) help? My intuition is that the pronounced ridges are caused by the shell setting too quickly (hence my initial attempts at decreasing the eggs and using a lower baking temperature), so maybe increasing the fat will fix it?

Another point is that the flour strength that Chef Migoya uses is very low, as he uses cake flour (let's say around 8% protein). Most people use equivalents of AP and/or bread flour, so in the 10.5-12% protein range. However increasing the flour strength would also be counterproductive if my intuition above (that the shells are setting too soon) is correct. What are your thoughts?
@Cahoot

Really your choux looks pretty darn good. I wonder how he got to 80°C. I have a low protein formula but it’s 90°C - 95°C. But it’s a European formula so it may be that it’s unbleached flour and he’s using bleached flour.

I like his technique. What I do different is I whisk my eggs. I want a good emulsion, so I don’t like to add the egg whole. And I always check my dough the last two addition to make sure there isn’t too much/little egg in the dough. I found it interesting that he looks at the movement of the dough, like macaron batter, rather than checks the gluten structure. I check the gluten structure.

I use either an Ateco 829 tip. I think the 869 has too many teeth.

I would say you need some strength to the dough.

I am thinking as as I write...cake flour is low protein, so very weak. Egg is a strengthener, so lowering the egg does not seem like a logical step. Butter is a fat; fat is a tenderizer, so increasing the fat does not seem like a logical step.

I don’t think adding more egg is the correct step for two reasons: 1) cake flour is low in protein, so absorbs less water than all purpose; 2) Canadian butter is lower in butterfat and higher in water, so there is probably slightly more water in your dough.

Flour is a strengthener. I would try increasing the flour in small increments. Start with something like 3% or 5%.

Interestingly I was thinking about pate a choux today. I was at my brother’s for an early Easter celebration. So on the drive home I stopped by the restaurant supply store to look for a mold for a new development project that I am going to start with my adult niece. I put a perforated baking tray in my cart thinking I should try it for pate a choux. But when I got in line to check out I thought I’ve got so much baking equipment that I need to stop buying stuff I don’t need. So I put it back.

I use an Ateco 829 tip. I think the 869 has too many teeth for pate a choux. The 829 is a tiny tad bigger.

The 869


2199C109-0191-4F03-8C0A-712FFA724DE3.jpeg


The 829

16D9FBEC-FE27-407D-A60C-DA6AF56DF301.jpeg
 
Joined
Feb 12, 2020
Messages
257
Reaction score
121
@Cahoot

Really your choux looks pretty darn good. I wonder how he got to 80°C. I have a low protein formula but it’s 90°C - 95°C. But it’s a European formula so it may be that it’s unbleached flour and he’s using bleached flour.

I like his technique. What I do different is I whisk my eggs. I want a good emulsion, so I don’t like to add the egg whole. And I always check my dough the last two addition to make sure there isn’t too much/little egg in the dough. I found it interesting that he looks at the movement of the dough, like macaron batter, rather than checks the gluten structure. I check the gluten structure.

I use either an Ateco 829 tip. I think the 869 has too many teeth.

I would say you need some strength to the dough.

I am thinking as as I write...cake flour is low protein, so very weak. Egg is a strengthener, so lowering the egg does not seem like a logical step. Butter is a fat; fat is a tenderizer, so increasing the fat does not seem like a logical step.

I don’t think adding more egg is the correct step for two reasons: 1) cake flour is low in protein, so absorbs less water than all purpose; 2) Canadian butter is lower in butterfat and higher in water, so there is probably slightly more water in your dough.

Flour is a strengthener. I would try increasing the flour in small increments. Start with something like 3% or 5%.

Interestingly I was thinking about pate a choux today. I was at my brother’s for an early Easter celebration. So on the drive home I stopped by the restaurant supply store to look for a mold for a new development project that I am going to start with my adult niece. I put a perforated baking tray in my cart thinking I should try it for pate a choux. But when I got in line to check out I thought I’ve got so much baking equipment that I need to stop buying stuff I don’t need. So I put it back.

I use an Ateco 829 tip. I think the 869 has too many teeth for pate a choux. The 829 is a tiny tad bigger.

The 869


View attachment 4114


The 829

View attachment 4113
So your theory is that the large ridges are caused by the choux paste being too weak rather than too strong. I will say that following his method, the choux paste ends up being a lot less runny than I usually see. Maybe possible that it dries out too quickly in the oven?

About the piping tip used, I figured that the finer teeth from using a French tip like the Ateco 869 would make would the ridges in the baked eclair shell less prominent, as opposed to using a regular open star tip like the Ateco 829. But maybe having less teeth in the pastry tip would help, I'll have to try it out.

I don't have any perforated baking sheets, but I did recently get some perforated silicone mats. They're not Silpain name brand, but rather cheap off-brand ones I got from Ali Express. I know that buying from something like Ali Express is asking for dubious quality, but the prices are so much cheaper than name-brand - I think I got them for like $4 each as opposed to around $40 that it would cost me for a single Silpain brand mat.
 
Joined
Jan 12, 2020
Messages
1,043
Reaction score
218
You might want to try a couple of eclair shells without the sharks teeth tip and bake on the same tray.
I never felt the need to use those tips but I've seen french bakers eggwash and stripe the top with the back of a fork.
Seems more work than needed, especially when doing volume work.
Best results I've had was using rice flour, same recipe.
 
Joined
Jun 22, 2017
Messages
4,067
Reaction score
2,081
So your theory is that the large ridges are caused by the choux paste being too weak rather than too strong. I will say that following his method, the choux paste ends up being a lot less runny than I usually see. Maybe possible that it dries out too quickly in the oven?

About the piping tip used, I figured that the finer teeth from using a French tip like the Ateco 869 would make would the ridges in the baked eclair shell less prominent, as opposed to using a regular open star tip like the Ateco 829. But maybe having less teeth in the pastry tip would help, I'll have to try it out.

I don't have any perforated baking sheets, but I did recently get some perforated silicone mats. They're not Silpain name brand, but rather cheap off-brand ones I got from Ali Express. I know that buying from something like Ali Express is asking for dubious quality, but the prices are so much cheaper than name-brand - I think I got them for like $4 each as opposed to around $40 that it would cost me for a single Silpain brand mat.


Yes, I think the deep striations are a sign that the dough is too weak. Dough strength comes from elasticity (glutenin) and extensibility (gliadin). The dough should have filled back in where the striations were made right after it was piped; then oven spring would have expanded the entire eclair wall evenly, so no grooves would have shown up. Instead, the dough remains collapsed where it pressed against the points of the tip. That tells me the dough never came back together—a lack of elasticity.


I thought his gluten check really odd. He looks at it like you do when making macaron batter, which is really looking for how much air is knocked out of the batter. He looks for the dough to move outward, which I guess is a very lame check for extensibility I guess. He never checks for elasticity. You need to check for both.

I do two tests: a string test and what I call the hanging dough test. Swirl the flat paddle in the dough, then lift it out. A couple of inches of dough should hang off the edge of the beater in a “V”. About ½” of the edge of the dough will be somewhat translucent. I have photos, but they are stuck in my dead laptop. The photos below are not mine, to did a freeze frame from a video. It is done using a rubber spatula, but same concept.

The recipe you use calls for a very low protein flour, so I don’t know how much gluten strength will show. But you should be checking for elasticity and extensibility in the dough. I don’t don’t think just looking at how the dough moves in the bowl is a proper assessment of gluten development.

Regarding the nozzle…I just don’t care for all lines created with a 869 or 867. I use them now and again, but end up going back to the 829.

I cannot believe what they charge for a silpain in Canada!! I pay $25 for them. But they are a high demand item, so sell out fast at the restaurant supply store, and it is not uncommon for them to be on back order online.
 
Last edited:
Joined
Oct 29, 2021
Messages
19
Reaction score
7
I personally preferred all water, no milk since in my opinion, the point of pate a choux is the contrast of the crispy shell with the creamy filling. The use of vegetable oil for a softer shell is interesting though, I've never heard of that before. Dusting with powdered sugar is also very helpful for browning. Traditionally people say to brush with egg wash, but then you risk the egg dripping onto the pan, which would coagulate in the oven and inhibit the choux's rise.

I experimented with pate a choux a couple months back to try to get the perfect éclair shell - no cracks, even oblong shape, and hollow - and after almost a dozen batches I actually found the ratio of 150% water/egg and 75% butter to give me the best results. This is really less liquid than most recipes I've seen call for. Usually people also call for a variable amount of eggs added to get to the right consistency, but I had good results just cooking the panade to 170°F, then adding a constant amount of eggs (150% of the flour). The two tests I've seen most commonly used for when you have the right hydration are the inverted V when dipping a spatula into the paste, or a trough when running a finger through the paste with a peak of dough when it's lifted. My ratios give a bit drier paste that doesn't pass those tests as well, but I found that with higher hydration, the shells had more cracks.

Also the traditional method is to start with a high temperature get the pate a choux to rise, then lower it to cook them through thoroughly, but I had best results baking at a constant 350°F. Similarly with the hydration, I think (at least for my oven and ratios) that the higher temperatures cause too much rise in the choux, resulting in cracks.

I really want to make a couple more batches just to ensure that I can get my éclairs shell consistent, but I got pretty sick of eating and making éclairs. I froze most of the batches that I made, and I just managed to bake off and finish the last shells this past week! It's really interesting just how finicky choux paste is - I had to do so much experimenting with ratio of ingredients and temperatures to get the results I wanted.

An unanswered question I have is about the technique of having additional steam in the oven. Some people put water in a pan on the bottom rack to create steam, which is what leavens the pastry, so it supposedly gives the éclairs a higher rise. However, I also know that injecting steam in ovens is a technique when baking bread to delay the formation of a crust. I'm wondering, how does steam created outside of the pastries help leaven them? Also, from my experiments I actually cut down on factors that increased the rise of the shells (hydration/higher temperature) since they lead to more cracks, presumably from the pate a choux expanding too much and too quickly. But if steam also delays the formation of a crust, does it circumvent this issue, allowing the choux to expand more in the early stages of baking, while also preventing a crust from setting which would lead to cracks when the choux is still trying to expand?
I do all the pate à choux for the shop, eclairs, puffs, religieuse and Paris-Brest. We have convection ovens where the fan cannot be turned off, which is not great for eclairs although I manage. They also tend to be dry ovens. I have tried injecting steam in the oven but I don’t find it helpful. What has helped me eliminate cracks is spraying the eclairs with pan spray and then giving them a dusting with powdered sugar. The pan spray will keep the dough from drying out in the freezer if you like to bake from frozen. If you’re baking the day you’re making the dough , it will help keep the eclair moist during the expansion.
for eclairs, I highly recommend letting them rest for at least an hour. I let them rest in a warm place as I find it easier to pipe them with a warm room temperature dough. Paris-Brest and puffs do t need this resting time.
 
Last edited:
Joined
Oct 29, 2021
Messages
19
Reaction score
7
I personally preferred all water, no milk since in my opinion, the point of pate a choux is the contrast of the crispy shell with the creamy filling. The use of vegetable oil for a softer shell is interesting though, I've never heard of that before. Dusting with powdered sugar is also very helpful for browning. Traditionally people say to brush with egg wash, but then you risk the egg dripping onto the pan, which would coagulate in the oven and inhibit the choux's rise.

I experimented with pate a choux a couple months back to try to get the perfect éclair shell - no cracks, even oblong shape, and hollow - and after almost a dozen batches I actually found the ratio of 150% water/egg and 75% butter to give me the best results. This is really less liquid than most recipes I've seen call for. Usually people also call for a variable amount of eggs added to get to the right consistency, but I had good results just cooking the panade to 170°F, then adding a constant amount of eggs (150% of the flour). The two tests I've seen most commonly used for when you have the right hydration are the inverted V when dipping a spatula into the paste, or a trough when running a finger through the paste with a peak of dough when it's lifted. My ratios give a bit drier paste that doesn't pass those tests as well, but I found that with higher hydration, the shells had more cracks.

Also the traditional method is to start with a high temperature get the pate a choux to rise, then lower it to cook them through thoroughly, but I had best results baking at a constant 350°F. Similarly with the hydration, I think (at least for my oven and ratios) that the higher temperatures cause too much rise in the choux, resulting in cracks.

I really want to make a couple more batches just to ensure that I can get my éclairs shell consistent, but I got pretty sick of eating and making éclairs. I froze most of the batches that I made, and I just managed to bake off and finish the last shells this past week! It's really interesting just how finicky choux paste is - I had to do so much experimenting with ratio of ingredients and temperatures to get the results I wanted.

An unanswered question I have is about the technique of having additional steam in the oven. Some people put water in a pan on the bottom rack to create steam, which is what leavens the pastry, so it supposedly gives the éclairs a higher rise. However, I also know that injecting steam in ovens is a technique when baking bread to delay the formation of a crust. I'm wondering, how does steam created outside of the pastries help leaven them? Also, from my experiments I actually cut down on factors that increased the rise of the shells (hydration/higher temperature) since they lead to more cracks, presumably from the pate a choux expanding too much and too quickly. But if steam also delays the formation of a crust, does it circumvent this issue, allowing the choux to expand more in the early stages of baking, while also preventing a crust from setting which would lead to cracks when the choux is still trying to expand?
I made another batch of eclair shells today, and got some quite interesting results. Just used the same recipe and techniques that I did before, nothing new. In the first picture below, on one side of the shells, the top row (left column) was virtually crack-free, while the bottom row (right column) developed some small cracks. However in the second picture that shows the opposite side of the shells, there were large cracks present in all the shells, but more pronounced in the top row than the bottom row. The third picture is just there to provide a better angle of the shapes of the shells - you can clearly see that the bottom row shells are both smaller and more unevenly shaped. That can be explained by piping at the wrong angle (starting at the side of the pan and ending in the middle, causing me to run into the already-piped eclairs on the top row) and running low on the choux paste at the end. I'm not exactly sure what caused the uneveness in how the cracks developed, but it probably has to due with uneven heat distribution in my oven.

View attachment 2842View attachment 2843View attachment 2844

Now to correct the cracks, there are a few ideas I have in mind. First, make sure water is boiling before adding flour, there are no flour lumps in the panade, and mix the panade until most of the moisture is gone before adding the eggs - I may have gotten lazy with those steps, and lumps of flour can of course cause cracks. However, since there's a clear pattern in the cracks, I'm not sure if that happened to be the case here.

One thing that jumps to mind is letting the oven preheat. I forgot to turn it on until fairly late, and so it had only reached the set temperature of 350F about 10 or less minutes before I put the pan in the oven. I know that having a long and complete preheat is important, especially for home ovens, and with how the cracks all happened in a pattern, I wouldn't be surprised if this was a big contributing factor.

Finally, I've seen people suggest monitoring the choux closely during early baking, and opening the door/spritzing water on them if the outsides set too soon. I guess this is similar to the idea of having a pan of water in the oven, but more controlled. It's an interesting idea, and I may try it next time.

Of course, once I'm happy with my eclair shells using the traditional individually-piped method, I still want to try the technique of freezing them, then cutting them to length before baking. Would cover up many of my mistakes in piping!
Some of those blow outs look like air bubbles that were not removed. I like to put the dough in my bag and spread it out, starting at the narrowest part of the bag and methodically pushing the dough towards the larger end, pushing out the air bubbles as I go. Then, push the dough back towards the narrow end of the bag, allowing any remaining bubbles a way to es ape put that end. If you see some bubbles on the piped eclairs, you can gently prick them with the tip of a knife and the dough should flow together to cover the hole.
 
Joined
Oct 29, 2021
Messages
19
Reaction score
7
I like the Iron Whisk blog. But although I agree with his use of pastry chef Eddy Van Damme as a source, but big eye roll with Alton Brown. Brown has a degree in media. He is not a food scientist or a baker. He plays a food scientist on television just like Patrick Stewart plays Capt. Jean-Luc Picard of the starship USS Enterprise. Alton Brown doesn’t even know the proper temperature to cream butter and sugar. But Eddy Van Damme is a good pastry chef.

I think you mentioned you were Canadian already, and I just forgot. Yes, your all purpose flour is very high in protein. But the problem with reducing the protein content in the flour is you throw the hydration off in your recipe since it was formulated for Canadian flour. what is the protein content in your pastry flour there?
@Cahoot

I was going to respond last night, then I realized it was late and the response would take a while to type out. So I thought I would wait til morning.

Pate a choux is a outlier in the world of pastry in that it is cooked twice and has a lot of gluten development. When I was going through the process I broke down the “why“ of first cooking. Understanding by I was cooking the dough in the first place helped me troubleshoot my problems.

Reasons for the first stovetop cooking:
  1. Trigger gluten
    • Flour has no gluten. There are two proteins, glutenin and gliadin that must bind with water in order for gluten to form. So until water and agitation happens, there is no gluten in flour.
  2. Trigger starch gelatinization
    • Dough needs to be at least 140°F (60°C)
    • Dough should not exceed 194°F (90°C)
    • Desired Dough Temperature (DDT) temperature 160°F (70°C) - this is just my target that i came up with
  3. Adds moisture
    • Required for gluten and starch gelatinization
    • Required for mechanical leavening
  4. Evaporate some water
    • Prepare dough to absorb egg
    • Too much water in dough
      • a) prevent the dough from absorbing the needed egg
      • b) cause the shells to crack and/or collapse
  5. Develop gluten
    • Mixing with paddle/wood spoon develops gluten
    • Beating to cool develops gluten
    • Beating in egg develops gluten

From trial and error and tips from other bakers, this is what I’ve learned

Ingredients

  1. Use 10% - 11% protein flour: all purpose flour, Central Millings unbleached Beehive (also the same as Whole Foods organic 365 and Safeway O Organic all purpose). Higher protein flours can cause cracks and distortions in shapes during baking as the choux has a lot of gluten development. Higher protein flour absorbs more liquid, so simply swapping higher protein flour in a recipe throws the ratios off.
  2. Adding a bit of sugar helps with browning. We Americans really under bake/brown most baked goods. It seems cake is the one thing we consistently over bake. Hahaha But Americans will still want an under baked choux
  3. Fresh eggs, the protein denaturation adds to the strength of the dough; yolk adds fat, and whites add moisture in the form of water.

Mixing

  1. Dissolve salt and sugar (if using) in water before you boil it. This will ensure no undissolved crystals are in the flour.
  2. Still mineral water: Pierre Herme often uses still mineral water in his recipes because the magnesium and calcium can strengthen the dough by creating tighter gluten bonds. This is a better approach than using a stronger flour in pastry. A stronger flour can make pastry tough. In pate a choux it also cause cracking as it requires more hydration; if a recipe is not formulated specifically for the higher protein content, the drier dough will crack during baking.
  3. Sift the flour to ensure there are no clumps in it
  4. Cube the butter to ensure it melts before the water boils
  5. Stir the butter after it’s melted to ensue the fat is distributed throughout the water before adding the flour
  6. Remove the pot of boiling water from the burner before adding flour
  7. After adding flour and mixing thoroughly, return to the heat and cook to trigger starch gelatinization
  8. Check the temperature: Stop at about 160°F (70°C). Starch gelatinization does not begin until the dough reaches 140°F (60°C) then maxes out at 194°F (90°C). Do not over cook the dough. Cooking the dough also evaporates the excess moisture out of the dough. This is very important. Too much moisture in the dough can cause shells to crack.
  9. Cool the panade before adding the egg. Remember the denaturalization of proteins is triggered by heat. Once the process starts, there’s no reversing it—you cannot un-cook egg. So cool the panade to just below 140°F (160°C) before adding egg. The mixing also allows steam to escape, which is moisture. So this helps to dry out the dough as well.
  10. Add egg in 3 or 4 additions
  11. Add last addition of egg in small increments and check to see if dough is absorbing it. Only add as much egg as the dough can absorb. You may not use all the egg that the formula calls for on a given batch because the water evaporation will vary by batch.
  12. Check gluten development. Perform the string test; dough should stretch more than 1” between thumb and index fingers. If using a stand mixer, check to see if the dough makes a “V” formation on the end of the paddle. The dough should hang a few inches on the end of the paddle and edges should be somewhat translucent on the edges
  13. Dough should be glossy, not matte


Baking

  1. Piping eclairs: Ateco #868 aka French Star. A round tip (nozzle) or tip with teeth that are too wide produce a less stable log. There’s something about the narrower striations that keeps the dough from distorting while baking. The eclair in my picture is a wider tip. I do not use that tip any more.
  2. Do not open the oven during baking. Both heat and steam will escape. It’s best to steam the oven before the bake begins by adding a shallow pan of boiling water on the lower rack
  3. Silat mat: some baker’s swear parchment paper cause the splitting on bottom. I can tell you in my own experience that the puffy round tube shape is due to the parchment paper. When I started using my mats, the eclairs started baking less puffy and more of the classic eclair shape.

Hope this helps
I’d add a few items to this excellent protocol:
1. Mix your eggs with a hand blender and pour them through a sieve. Let them age overnight. I like blending them because it’s easier to add small amounts of egg if necessary. Sometimes a whole egg is too much. If you dry your panade to a set temperature, between 60F and 70F there will be less variation in the amount of egg you use.
2. Once you’re dough is mixed, let it rest at warm room temperature for an hour. It should be covered with cling film on contact so the dough doesn’t form a skin. I only let the dough rest for eclairs.
3. Piping eclairs evenly takes a lot of practice. The pressure you exert on the bag has to be even, the angle has to be correct and the speed has to be correct. It takes practice
4. I pipe on perforated mats and put those mats on a perforated baking sheet.
5. Bake in an oven with no fan if possible. I don’t have this luxury at work and my eclairs are still good but they are better at home. CF331F53-9AE1-44AE-BD23-18CB53DB181F.jpegB8F17C9F-3AB6-4093-B322-857887626145.jpeg39AAA0FA-C829-4610-9766-8544B61EB344.jpegA12577A2-12BD-416D-AF4E-FBF300E51DCE.jpeg4B3B9095-DDCA-4B8B-9174-A838C4474740.jpegF8447582-5693-41D5-8A82-D2AB6238E64F.jpegB9C4DAD1-378D-4537-AB13-D21B737141DF.jpeg5977D2AA-EB5C-49E5-8C57-148CF5C9BCCA.jpeg9D9CF963-DC46-4492-B657-C2CF4DA94429.jpeg0875F4B6-D425-4A38-B20C-16F60BE7BE6A.jpeg
 
Joined
Jan 12, 2020
Messages
1,043
Reaction score
218
I’d add a few items to this excellent protocol:
1. Mix your eggs with a hand blender and pour them through a sieve. Let them age overnight. I like blending them because it’s easier to add small amounts of egg if necessary. Sometimes a whole egg is too much. If you dry your panade to a set temperature, between 60F and 70F there will be less variation in the amount of egg you use.
2. Once you’re dough is mixed, let it rest at warm room temperature for an hour. It should be covered with cling film on contact so the dough doesn’t form a skin. I only let the dough rest for eclairs.
3. Piping eclairs evenly takes a lot of practice. The pressure you exert on the bag has to be even, the angle has to be correct and the speed has to be correct. It takes practice
4. I pipe on perforated mats and put those mats on a perforated baking sheet.
5. Bake in an oven with no fan if possible. I don’t have this luxury at work and my eclairs are still good but they are better at home. View attachment 4464View attachment 4462View attachment 4459View attachment 4460View attachment 4461View attachment 4467View attachment 4468View attachment 4469View attachment 4470View attachment 4471
It looks like you're using fondant.
 
Joined
Jun 22, 2017
Messages
4,067
Reaction score
2,081
I do all the pate à choux for the shop, eclairs, puffs, religieuse and Paris-Brest. We have convection ovens where the fan cannot be turned off, which is not great for eclairs although I manage. They also tend to be dry ovens. I have tried injecting steam in the oven but I don’t find it helpful. What has helped me eliminate cracks is spraying the eclairs with pan spray and then giving them a dusting with powdered sugar. The pan spray will keep the dough from drying out in the freezer if you like to bake from frozen. If you’re baking the day you’re making the dough , it will help keep the eclair moist during the expansion.
for eclairs, I highly recommend letting them rest for at least an hour. I let them rest in a warm place as I find it easier to pipe them with a warm room temperature dough. Paris-Brest and puffs do t need this resting time.

I just did another class here recently on choux. And the baker did something really interesting and that was to heat the deck oven to 530°F, then turn it off.

He left the eclairs in for about 25 minutes. He then turn the oven on to 300°F and baked another 25 minutes. They turned out perfect.

I’m trying to remember if he vented to let the steam out. He may have I don’t remember.

I’ve never seen anyone use an oven that hot before. But it confirmed to things: perforated mat and no fan are the best for baking.
 
Joined
Jun 22, 2017
Messages
4,067
Reaction score
2,081
I’d add a few items to this excellent protocol:
1. Mix your eggs with a hand blender and pour them through a sieve. Let them age overnight. I like blending them because it’s easier to add small amounts of egg if necessary. Sometimes a whole egg is too much. If you dry your panade to a set temperature, between 60F and 70F there will be less variation in the amount of egg you use.
2. Once you’re dough is mixed, let it rest at warm room temperature for an hour. It should be covered with cling film on contact so the dough doesn’t form a skin. I only let the dough rest for eclairs.
3. Piping eclairs evenly takes a lot of practice. The pressure you exert on the bag has to be even, the angle has to be correct and the speed has to be correct. It takes practice
4. I pipe on perforated mats and put those mats on a perforated baking sheet.
5. Bake in an oven with no fan if possible. I don’t have this luxury at work and my eclairs are still good but they are better at home. View attachment 4464View attachment 4462View attachment 4459View attachment 4460View attachment 4461View attachment 4467View attachment 4468View attachment 4469View attachment 4470View attachment 4471

Resting the dough makes such a huge difference.
 
Joined
Oct 29, 2021
Messages
19
Reaction score
7
It looks like you're using fondant.
No fondant. On the passionfruit and raspberry eclairs it is a confit that is made with the fruit purée and gelatin. It is spread out thin, pressed between two guitar sheets, frozen and cut out. When it is placed on the filled eclair and left at room temperature for a few minutes, the frozen shape relaxes I to the top of the eclair. It a like a magic trick.

On the other eclairs it’s a chocolate based coating with a tiny amount of gelatin but nowhere near as much as a mirror glaze.
 
Joined
Feb 12, 2020
Messages
257
Reaction score
121
Haven't checked this forum in a while, but I agree with all the points you made @Chouquette. I always bake on a perforated silicone mat on a perforated baking sheet now, and rest my pate a choux before using. I tested resting 1 hour vs. 3 hours and found that 3 hours did have a slight improvement over 1 hour, but there while there wasn't any noticeable improvement in resting 1 day vs. ~3 hours, I often make my pate a choux the day before just for time management's sake.

I also find runnier batters easier to pipe, up to a certain degree, so I actually keep my pate a choux somewhere slightly warmer than room temp before using it too. When I look at making-of videos of the nicest looking eclair shells I've seen on social media, they always have a much runnier batter than mine, even though I think my formula has a fairly high liquids and eggs ratio already.

I don't have any recent pictures of my naked eclair shells, but have a couple of some eclairs I made more recently. These aren't actually the best shells I've made - I made a small adjustment to my formula (bumping the eggs up slightly) since taking these pictures and my shells since have turned out smoother, larger, and slightly more hollow.

Is the chocolate-based glaze you used @Chouquette the Christophe Adam recipe? That's what I used for the apricot ones I posted (orange-coloured), and for the caramel ones I used another Christophe Adam recipe that's essentially a caramel mixed with fondant. For this one, I piped the glaze on using a large flat tip, which I"ve found is much faster and easier to make a neat glaze than dipping. Unfortunately, the 3cm-wide tip I have is slightly smaller than ideal for the size of eclair shells I make.

@Norcalbaker59 Remember we used to have a conversation about where to get a pastry tip like the one I mentioned above? I ended up placing an order from France for a bunch of pastry equipment that either wasn't available or outrageously expensive here in North America (spent 150 before currency conversion to CAD, shipping, and customs! I think I ended up paying almost $350CAD in total by the end of it), and got this tip as part of it.

Edit: I also wanna mention that I tested out using different types of coatings for the eclair shells before baking:
1) Non-stick spray + powdered sugar
2) Non-stick spray + dextrose
3) Mycryo + dextrose

I found that both combinations with dextrose browned the shells way too much for my formula, and they ended up slightly burnt before getting fully cooked. Otherwise there was no noticeable different in the shape of the shells (including the test with Mycryo); it was just the colour difference. I haven't tested Mycryo + powdered sugar, but honestly since non-stick spray works fine I'm happy to stick with it since it is much less expensive than using Mycryo.
 

Attachments

  • IMG_20220225_164926[1].jpg
    IMG_20220225_164926[1].jpg
    138.6 KB · Views: 36
  • IMG_20220317_150850[1].jpg
    IMG_20220317_150850[1].jpg
    125.1 KB · Views: 40
Last edited:
Joined
Oct 29, 2021
Messages
19
Reaction score
7
Haven't checked this forum in a while, but I agree with all the points you made @Chouquette. I always bake on a perforated silicone mat on a perforated baking sheet now, and rest my pate a choux before using. I tested resting 1 hour vs. 3 hours and found that 3 hours did have a slight improvement over 1 hour, but there while there wasn't any noticeable improvement in resting 1 day vs. ~3 hours, I often make my pate a choux the day before just for time management's sake.

I also find runnier batters easier to pipe, up to a certain degree, so I actually keep my pate a choux somewhere slightly warmer than room temp before using it too. When I look at making-of videos of the nicest looking eclair shells I've seen on social media, they always have a much runnier batter than mine, even though I think my formula has a fairly high liquids and eggs ratio already.

I don't have any recent pictures of my naked eclair shells, but have a couple of some eclairs I made more recently. These aren't actually the best shells I've made - I made a small adjustment to my formula (bumping the eggs up slightly) since taking these pictures and my shells since have turned out smoother, larger, and slightly more hollow.

Is the chocolate-based glaze you used @Chouquette the Christophe Adam recipe? That's what I used for the apricot ones I posted (orange-coloured), and for the caramel ones I used another Christophe Adam recipe that's essentially a caramel mixed with fondant. For this one, I piped the glaze on using a large flat tip, which I"ve found is much faster and easier to make a neat glaze than dipping. Unfortunately, the 3cm-wide tip I have is slightly smaller than ideal for the size of eclair shells I make.

@Norcalbaker59 Remember we used to have a conversation about where to get a pastry tip like the one I mentioned above? I ended up placing an order from France for a bunch of pastry equipment that either wasn't available or outrageously expensive here in North America (spent 150 before currency conversion to CAD, shipping, and customs! I think I ended up paying almost $350CAD in total by the end of it), and got this tip as part of it.

Edit: I also wanna mention that I tested out using different types of coatings for the eclair shells before baking:
1) Non-stick spray + powdered sugar
2) Non-stick spray + dextrose
3) Mycryo + dextrose

I found that both combinations with dextrose browned the shells way too much for my formula, and they ended up slightly burnt before getting fully cooked. Otherwise there was no noticeable different in the shape of the shells (including the test with Mycryo); it was just the colour difference. I haven't tested Mycryo + powdered sugar, but honestly since non-stick spray works fine I'm happy to stick with it since it is much less expensive than using Mycryo.
Beautiful éclairs Cahoot. The chocolate glaze I used comes from a course I took with Kica Academy.
 
Joined
Feb 12, 2020
Messages
257
Reaction score
121
Beautiful éclairs Cahoot. The chocolate glaze I used comes from a course I took with Kica Academy.
I didn't say this in my original post, but when I first saw your pictures of your eclairs I thought you just took them from the Internet since they looked so perfect. All your pate a choux products you've posted here have been very impressive; the vast majority of the pate a choux I've seen in even well-regarded pastry shops here in North America seem a bit sloppy.

I've actually been curious myself bout the eclairs course at KICA specifically because of the glaze used. I've been on a quest to find a good non-fondant, non-dark chocolate eclair glaze, but haven't been completely satisfied with any of the ones I've tested. I've even been very tempted to buy the Eclair book by Garuharu specifically just to see the glaze they use haha, but it's a bit too pricey for me right now.

Would you mind sharing the recipe of the glaze here or privately? Of course if you don't want to then I completely understand, as it's from a course you had to pay for.
 

Ask a Question

Want to reply to this thread or ask your own question?

You'll need to choose a username for the site, which only take a couple of moments. After that, you can post your question and our members will help you out.

Ask a Question

Members online

No members online now.

Forum statistics

Threads
6,568
Messages
47,299
Members
5,508
Latest member
Cheryl N.

Latest Threads

Top