Victoria Sponge Sandwich

Joined
Apr 1, 2019
Messages
209
Reaction score
173
Made one today, second time I've made one. First one I made a few months ago was delicious but this one is off the scale yummy! :) I've come to realise, from various baking videos, how important it is to gently fold in flour and not push out the air, because my sponge is super light and airy. So I used my new stand mixer for the butter, sugar and eggs and then did the flour by hand. By the way, the first thing that hit me on flavour was the butteriness and then I remembered that I didn't use butter, I used Stork margarine. In fact, I used a copy of Stork, Tesco's own baking spread. Honestly it's so much cheaper to buy a 500g tub of spread than a 250g block of butter, and it's every bit as good for cakes.

20190411_212644.jpg
20190411_213331.jpg
20190411_213051.jpg
 
Joined
Jun 22, 2017
Messages
4,067
Reaction score
2,081
That’s a very lovely Victoria sponge @Lee_C! I love the simplicity of Victoria sponge. In this age of instagram and reality cooking and baking shows, cake has become a vehicle for extreme conspicuous consumption. The amount of crap people have been piling on cakes overwhelms the senses and frankly, nauseates me. I cannot take those drip cakes thick with multiple layers of icing, then piled high with chunks of candy bars and marshmallows, then drizzled all over with chocolate and caramel. The Victoria sponge, in its simplicity, is how cake is shared among friends. It is a wonderful reminder of how we celebrated life in our mother’s and grandmother’s kitchens. Thank you for sharing:)
 
Joined
Apr 1, 2019
Messages
209
Reaction score
173
Thank you Norcalbaker and I do agree with you :)

Now then, as nice as I think my cake tastes, the texture of the sponge is never completely moist, always a little on the dry side.

I wonder if you might be able to impart some more of your baking experience for me ....what is the secret to a lovely moist sponge? Also, best way to store it? I didn't want to refrigerate it as I think that can dry up sponge more, but then, it's got fresh cream in it which needs refrigerating really.
 
Joined
Jun 22, 2017
Messages
4,067
Reaction score
2,081
Thank you Norcalbaker and I do agree with you :)

Now then, as nice as I think my cake tastes, the texture of the sponge is never completely moist, always a little on the dry side.

I wonder if you might be able to impart some more of your baking experience for me ....what is the secret to a lovely moist sponge? Also, best way to store it? I didn't want to refrigerate it as I think that can dry up sponge more, but then, it's got fresh cream in it which needs refrigerating really.

@Lee_C,

I would be happy to help you figure out why the Victoria sponge recipe you use is on the dry side. I will need to see the recipe as the baker’s percentages and the mixing method are important factors in how a cake turns out. So it would definitely help to see the recipe in its entirety. Also it would help to know if your oven is fan assisted and the type of cake tin used, whether it’s coated for non-stick, dark metal, or natural metal. (See pic below for examples of different metals and treatments). The material and treatment of a cake tin has a significant effect on the rise, texture and moisture level of the finished product.

*=*=*=*=*=*=*=*=*=*

The mini bundt cake (top) is both non stick coated and dark

The cake tin (bottom) is light and “natural” metal because the aluminum is not coated
A75735FF-147B-445B-8D80-C86A92B87631.jpeg
 
Joined
Apr 1, 2019
Messages
209
Reaction score
173
Thanks Norcalbaker. When it came out of the oven, the sponge was nice and soft, but all around the edges/sides were a bit hard and crispy and part of the underside was a little burnt. I hadn't kept it in the oven any longer than it should be, just until it turned golden brown.

Of all the baking tins I have, my cake tins are the cheapest and I've also wondered if they're affecting the quality of the bake. It's a loose base release but the tin is thin and flimsy. It is non stick though. I think I'll invest in some better quality heavy duty ones like my brownies and tart tins.

My oven is fan assisted but I don't know if the temperature I baked at was correct. On average, recipes quote 180c, but I chose 170c so that it would bake slower and not brown the outside too quickly. Maybe that's not a good idea?

Here I'm pasting the recipe and notes I made for myself.

' *Weight of butter, sugar and flour needs to be same as weight of eggs in shells. Last time my eggs weighed 224g, so I used 224g of the other ingredients *

4 medium eggs
Caster sugar
Self raising flour
Stork - I used supermarket equivalent baking spread,
2 teaspoons baking powder
About 1/4 teaspoon salt
About 1/4 to 1/2 teaspoon vanilla extract.

Cream baking spread and sugar in mixer.
Add eggs one at a time.
Remove bowl from mixer and by hand gently fold in flour, salt and baking powder. Also add in the vanilla extract. Consistency should almost drip off spatula.
(*mine didn't really drip off, was a bit thicker)

Butter each cake pan. Cut out baking paper into circles and put into base of pans. Butter the paper too and flour the tin. This makes easier release of sponge from tin and for peeling paper off underside.
Pour mixture equally into tins.

Bake at 170c for 20 to 25 minutes.

Allow to cool on rack for 10 minutes before turning them out.

Then let them cool enough before spreading with good quality raspberry jam.
Whip up 150ml of double cream.
Dust top with icing sugar. '

If you look at my last photo, you can see the burn marks where the sponges are next to each other at 9 o'clock and 3 o'clock. Hmm, I bet a more substantial tin base might avoid that happening.
 

Attachments

  • 20190411_192705.jpg
    20190411_192705.jpg
    110.3 KB · Views: 225
  • 20190411_194436.jpg
    20190411_194436.jpg
    92.6 KB · Views: 214
  • 20190411_201311.jpg
    20190411_201311.jpg
    105.9 KB · Views: 219
  • 20190411_203931.jpg
    20190411_203931.jpg
    107.4 KB · Views: 213
  • 20190411_204111.jpg
    20190411_204111.jpg
    120 KB · Views: 220
Joined
Jun 22, 2017
Messages
4,067
Reaction score
2,081
Okay I see the problem.

The recipe is what it should be: flour, butter, and sugar are all equal to the weight of the eggs in the shell. The Victoria sponge is a misnomer since the cake is actually a pound cake. This distinction is important because cake is baked to internal temperature. But more on that below.

The dry cake is a result of oven temperature and the baking tin.

The cake batter in direct contact with the metal will always bake faster than the batter in the center of the cake.

Dark colored metal, coated metal, and anodized aluminum conduct heat much more intensely than a natural metal. This results in even faster baking of the cake batter in direct contact with the metal.

By the time the center is baked the crust on the sides and bottom of the cake is thick and tough. And the entire cake through and through is dry.

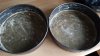
The picture below demonstrates the effect of bakeware material on cake. These chiffon cakes were baked using the same recipe, the same batter, mixed at the same time, baked at the same time; so same oven temperature, and baked for the same amount of time. The only difference was the top cake was baked in an anodized aluminum pan, and the bottom cake was baked in a natural metal pan.

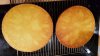
As you can see there is a marked difference in the look of the baked cakes. The dark crust on the top cake is dry, tough, and aesthetically unpleasing. The entire cake is significantly drier than the light colored cake with no crust on the bottom. And the bottom cake came out of the tin with no crust on the side and bottom.

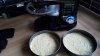
The second photo shows another orange chiffon cake. Note there is no dark crust around the side of either cake. It literally comes out of the pan that way. The top of the cake has a brown crust because it is fully exposed to the dry heat in the oven. The second cake in the background has the top crust removed. I always remove the top crust of my cakes for better aesthetics when The cake is sliced and plated.


All dark metal, nonstick coating, and anodized aluminum cake tins overbake because they conduct heat much more intensely than a natural metal tin.


When using a dark colored metal, coated metal, or anodized aluminum you must reduce the baking temperature. When using celsius if the recipe states an oven temperature of 170°C, reduce the temperature up to 160°C.


160°C is comparable to 325°F.


I use natural metal pans and bake all of my cakes are baked at 325°F (162°C).


THE PRICE OF THE TIN IS NOT AN INDICATOR OF QUALITY. It’s about the type of metal and the coating. The tins I use are cheaper than most tins. And most commercial kitchens use this type of bakeware as it conducts heat less Intensely.

Most of the bakeware sold in the UK Is dark metal and coated. If you decide to invest in new cake tins, I would recommend PME or Lakeland’s Mary Berry cake tin. And specifically the Mary Barry because all of Lakeland other tins are dark and coated. With the PME and Mary Berry tins the oven temperature WILL STILL need to be reduced. But they should produce a slightly better result.

Baking a cake to internal temperature rather than time is also very important. As batter bakes, the water in the ingredients evaporates.

Victoria sponge does not have any added liquid. It gets all of its moisture from eggs and butter. Substituting margarine for butter may reduce the amount of water in the batter as the amount of water in margarine varies by manufacturer.

But all baked goods regardless of the type, should be baked to internal temperature, not time.

Butter cakes (includes pound cake) center of cake internal temperature of 200°F - 205°F is done.

Foam, angel food, sponge cakes: 205°F - 210°F is done.

Water boils at 212°F. Never allow a cake to go over 212°F as the amount of loss hydration due to evaporation will result.

As I mentioned above the Victoria sponge is not a sponge, it is a pound cake. Bake it to the internal temperature of a pound cake.

Mixing is also very important. One of the most common mistakes made in baking is improperly cream in the butter (or margarine) and sugar. Below is a link explaining how creaming is properly done. This applies to all creaming of butter and sugar regardless if it is for cookies or cake.

Since the Victoria sandwich is not iced it will dry out more quickly than an iced cake. Since you use a whipped cream filling this cake must be refrigerated. And refrigeration dries out cake. There’s no full proof way to keep this moist.

To store the cake wrap it in two layers of plastic wrap. If you have a cake carrier, place the wrapped cake in it. Let the cake warm up on the counter before serving. Then sprinkle on the powdered or caster sugar.


When storing a cake that has been sliced already, please a piece of plastic film directly on The surface of the cut area. Then wrap the cake in plastic as described above.


Placing a piece of plastic directly on the surface of the cut area applies to an iced cake as well. Of course with an iced cake you cannot wrap the entire cake in plastic. But you should cover the sliced section.


How to cream butter
https://www.seriouseats.com/2015/12/cookie-science-creaming-butter-sugar.html


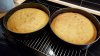
The only difference in these two cakes is the type of tin. I sliced the top cake open to show the interior—The interior is darker than the cake baked in a natural metal cake tin
2B2A13D1-5927-40AF-A9B8-AF369BA8660B.jpeg


Cake in the forefront is what the cake looks like out of the pan. There is no dry, dark crust on the sides and the bottom. The cake in the back ground has the top crust remove.
1737363F-BC31-4215-B4FF-D12208B30354.jpeg


The reason I remove the top crust is for aesthetics. This is a test cake for a birthday cake If you zoom in you will see there is no dark crust line between the cake and the buttercream. How a slice of cake looks plated is part of the decorating process. I do not like to see brown crust lines any where on my cakes.
64BAB3EE-2982-42B0-BDAE-01694F1ACE5B.jpeg
 
Joined
Apr 1, 2019
Messages
209
Reaction score
173
Excellent. That's really useful information right there, count me educated! :D

Some questions as usual if you don't mind.

What is the natural metal your tins are made of?

Which of these tins would be best to get, i.e, for Victoria Sponge or similar, the shallower or the deeper tin?
Mary Berry 20cm Sandwich tin
https://www.lakeland.co.uk/71375/Mary-Berry-with-Lakeland-20cm-Sandwich-Tin
Mary Berry 20cm Deep tin.
https://www.lakeland.co.uk/71376/Mary-Berry-With-Lakeland-20cm-Deep-Cake-Tin

Here is a PME tin with great reviews and also cheaper than the Mary Berry, however, it seems it's not loose base, and I think it's a bit easier with loose base.
PME 8" x 2"
https://www.amazon.co.uk/PME-Anodis...PME+cake+tins&qid=1555278045&s=gateway&sr=8-5

The PME is anodised aluminium which you said conducts heat too fast, and the Mary Berry is carbon steel. Would carbon steel be better than anodised aluminium in slowing down the intensity of the heat conduction?
I have a gift voucher for a store here called John Lewis, and there's this carbon steel tin I should also consider https://www.johnlewis.com/john-lewis-partners-classic-springform-non-stick-cake-tin/p1967673

When reducing the temperature by up to 10c to compensate, should I still stick to the
amount of baking time stated on the recipe?

If I don't want a cake's internal temperature to go over, say, 212F, how would I measure that without opening the oven door and risk the cake deflating? I've got an oven thermometer, but that wouldn't measure the internal cake temperature. Should I wait till it looks like it's not going to deflate, then open the oven door and stick my digital thermometer (once I have it) into the cake?

Would you say I'd get a more moist cake with butter instead of margarine, since you mentioned that margarine might have less water?


I will do what you suggested regarding layers of plastic wrap. I think also that if I can make my cakes moist enough, then hopefully refridgerating won't make it noticeably dry.

I really like your suggestion of a cake carrier, that's a brilliant idea. Maybe I should buy one of these clip lock caddys.
https://www.lakeland.co.uk/19667/Cake-Carrier-Caddy-&-Clear-Lid---Round-Holds-27cm-Cakes

I had read that article a few days ago on creaming sugar and butter and I creamed my butter and sugar for a quite a while. But I'll have another read of it.

Thanks for your photos, your birthday cake looks so delicious! Reminds me of something over here we call angel cake which I love.
 
Joined
Jun 22, 2017
Messages
4,067
Reaction score
2,081
Excellent. That's really useful information right there, count me educated! :D

Some questions as usual if you don't mind.

What is the natural metal your tins are made of?

Which of these tins would be best to get, i.e, for Victoria Sponge or similar, the shallower or the deeper tin?
Mary Berry 20cm Sandwich tin
https://www.lakeland.co.uk/71375/Mary-Berry-with-Lakeland-20cm-Sandwich-Tin
Mary Berry 20cm Deep tin.
https://www.lakeland.co.uk/71376/Mary-Berry-With-Lakeland-20cm-Deep-Cake-Tin

Here is a PME tin with great reviews and also cheaper than the Mary Berry, however, it seems it's not loose base, and I think it's a bit easier with loose base.
PME 8" x 2"
https://www.amazon.co.uk/PME-Anodis...PME+cake+tins&qid=1555278045&s=gateway&sr=8-5

The PME is anodised aluminium which you said conducts heat too fast, and the Mary Berry is carbon steel. Would carbon steel be better than anodised aluminium in slowing down the intensity of the heat conduction?
I have a gift voucher for a store here called John Lewis, and there's this carbon steel tin I should also consider https://www.johnlewis.com/john-lewis-partners-classic-springform-non-stick-cake-tin/p1967673

When reducing the temperature by up to 10c to compensate, should I still stick to the
amount of baking time stated on the recipe?

If I don't want a cake's internal temperature to go over, say, 212F, how would I measure that without opening the oven door and risk the cake deflating? I've got an oven thermometer, but that wouldn't measure the internal cake temperature. Should I wait till it looks like it's not going to deflate, then open the oven door and stick my digital thermometer (once I have it) into the cake?

Would you say I'd get a more moist cake with butter instead of margarine, since you mentioned that margarine might have less water?


I will do what you suggested regarding layers of plastic wrap. I think also that if I can make my cakes moist enough, then hopefully refridgerating won't make it noticeably dry.

I really like your suggestion of a cake carrier, that's a brilliant idea. Maybe I should buy one of these clip lock caddys.
https://www.lakeland.co.uk/19667/Cake-Carrier-Caddy-&-Clear-Lid---Round-Holds-27cm-Cakes

I had read that article a few days ago on creaming sugar and butter and I creamed my butter and sugar for a quite a while. But I'll have another read of it.

Thanks for your photos, your birthday cake looks so delicious! Reminds me of something over here we call angel cake which I love.


Regarding John Lewis vs. Mary Berry’s carbon steel sandwich tin... The John Lewis pan is designed for cheesecake, not cake batter. The coating is also extremely dark, which is only going to add it to the heat intensity.


The Mary Berry tin also has a dark coating on it for easy release. So that will make it conduct heat more intensely. So oven temperature should it be REDUCED if using that tin. But of the two I think the Mary Berry will bake cooler than the John Lewis.


Carbon steel will definitely conduct heat more intensely than natural aluminum. That’s one of the reasons it is the preferred metal for the Chinese wok.


The PME is very similar to the Fat Daddio anodized aluminum tins. The Fat Daddio tins are extremely popular here. I think they’re also available in the UK but they are quite expensive. They are popular with home and professional bakers a like.


Regarding the cake tins I use...natural metal tins are aluminum. The ones I use are made by Chicago Metallic, NordicWare, and Parrish Magic Line. But the natural aluminum is not available in the UK. I think the only aluminum you can get in the UK is anodized aluminum.

Regarding baking time… no you don’t want to bake by time. It takes about 18 - 20
minutes for the cake to fully set. Around 20 minutes into the bake take a look at the cake. If the batter looks like it has set across the top, do the touch test. Lightly touch the center of the cake with your fingertip. If a small finger imprint remains on the cake it is NOT ready to be tested for temperature. Continue baking and do a touch test every few minutes. Do not wait more than 5 minutes to touch test again as longer could result in an over-baked cake.

When you touch the cake and the imprint springs back up most of the way, check the internal temperature of the cake with an instant read thermometer. Take care not to touch the tip of the thermometer on the bottom of the cake tin as may give a false reading.

After you bake a half a dozen of these cakes you’ll be able to do the touch test and know from it whether the cake is baked or not. You won’t have to use the thermometer.


Baking times on recipes are never accurate. Every cake will bake at different rates because the brand of ingredients used will affect The moisture content in the cake. That in turn will affect bake time The brand of ingredients so affect the end product that I state the brands I use whenever I give someone a recipe. So you cannot go by bake time on the recipe, you must bake by internal temperature.


Regarding opening the oven…If the cake recipe is well formulated you can open the oven door during baking no problem. I open the oven door all the time to check my chiffon cakes (and all my cakes) and I’ve never had a cake deflate on me ever. Just give the cake around 20 minutes to bake, then open the door to see if the cake looks set on top. If it looks set, do the touch test described above.

Regarding butter versus margarine… whether the cake is more moist with butter or margarine would depend on knowing the water content of the margarine. Since manufactures don’t release that information it’s impossible to know how much moisture margarine has in it. Before you make the switch, I would recommend you first work with oven temperature and using cloth baking strips (more on that below). Learning how to adjust your baking to your specific oven and baking equipment will benefit you in all your baking. And that’s why I encourage you towards that approach first.

And I would definitely encourage you to watch the video and read the article on creaming butter and sugar. Well creamed butter and sugar helps tremendously with the rise and fine crumb.


Regarding the cake carrier… Yes that is a good carrier. I’m ashamed to admit to the number of carriers and cake covers I own. I have a carrier very similar to the lakeland. That carrier gets more uses than any of the other carriers I have. I routinely use that to store my cakes in the refrigerator.


To keep your cake from sliding around in the carrier if transporting it, place a piece of non-skid pad underneath your plate or cake board.


Cloth baking strips...Another way to prevent over-browning is to use a wet cloth baking strip around the tin. The wet cloth keeps the outside of the tin slightly cooler. That intern slows the rate of baking.

The oven temperature still needs to be reduced based on the type of tin. So cloth baking strips are in addition to lowering oven temperature.

I swear by baking strips. Not only does it cool the outside of the pan, but the cake bakes level instead of domed. A domed cake is a dry cake. And it’s a waste of money because the cake is leveled (top is cut off and tossed) before the cake is filled and stacked. And leveling a cake to make it aesthetically pleasing does not make it a delicious cake. A beautifully decorated dry cake is still a dry cake.

You can make baking strips with wet paper towels and aluminum foil (link below). You can also make them with scrape cotton cloth with a tight weave. Cut it long enough to wrap around the pan with A couple of extra inches. Soak the cloth strip in water before you start mixing your batter. When ready to use squeeze out the excess water. Do you want the strip wet but not dripping. Before you fill the cake tins, wrap the cloth around the outside and pin it.


DIY Aluminum foil and paper towel


These are the tins I use. But they are not available in the UK.

Chicago Metallic

https://www.amazon.com/Chicago-Metallic-Commercial-Traditional-Uncoated/dp/B003YKGRK0


Magic Line. This cake tin, especially their square tins, has a cult following among wedding cake bakers. It produces sharp clean lines. It does not over brown the cake. In the US the traditional wedding cake is a classic white cake. So the color of the cake is very important.


https://www.sweettreatsupply.com/pa...tm?searching=Y&sort=7&cat=1828&show=60&page=2


Nordicware Naturals


https://www.nordicware.com/bakeware/naturals-aluminum-bakeware?p=4


Some of my cloth baking strips. The worn strip has been used a couple dozen times. If you bake cake a couple times a month a set of strips should last a couple of years.
F5DB25AB-772C-4E96-A473-834896CF91EF.jpeg
 
Joined
Apr 1, 2019
Messages
209
Reaction score
173
Thanks Norcal, absolutely fantastic, strips are clearly the answer to my problem! :)

That video you linked is great, I totally get it now. And I'm also thinking he must be related to Jeff Goldblum :p

You know, I'd seen the silver coated PME baking belts on Amazon a while back and never took the time to see what they're for, but now I know!

I will do the foil and kitchen roll belt, but I think I'll ultimately invest in some proper belts. The Wilton ones look best, like the ones in your photo. There's some cheaper ones on Amazon that look identical to the Wiltons right down to the pattern and colour, but I'm guessing won't be as effective, like most copies of things.


The size of each Wilton strip is 35" x1.5", they would be perfect for my round tins. Would two strips together fit comfortably around my 8" x 8" by 3" square tin?

I'm going to buy the Mary Berry tins on your recommendation.
Thanks very much for all the other info you typed out, very very helpful indeed. And I like the look of the Nordicware tins.
 
Last edited:
Joined
Jun 22, 2017
Messages
4,067
Reaction score
2,081
Thanks Norcal, absolutely fantastic, strips are clearly the answer to my problem! :)

That video you linked is great, I totally get it now. And I'm also thinking he must be related to Jeff Goldblum :p

You know, I'd seen the silver coated PME baking belts on Amazon a while back and never took the time to see what they're for, but now I know!

I will do the foil and kitchen roll belt, but I think I'll ultimately invest in some proper belts. The Wilton ones look best, like the ones in your photo. There's some cheaper ones on Amazon that look identical to the Wiltons right down to the pattern and colour, but I'm guessing won't be as effective, like most copies of things.


The size of each Wilton strip is 35" x1.5", they would be perfect for my round tins. Would two strips together fit comfortably around my 8" x 8" by 3" square tin?

I'm going to buy the Mary Berry tins on your recommendation.
Thanks very much for all the other info you typed out, very very helpful indeed. And I like the look of the Nordicware tins.

@Lee_C, Oh I would definitely encourage you to lower the oven temperature and make the DIY baking strips before purchasing new tins.

If you do get to the point where you want to invest in cloth strips, I wouldn’t hesitate to recommend the Wilton brand. I can’t sing the praises of Wilton strips enough.

I’ve been using the Wilton strips for about 9 years now and I swear by them. I won’t put a cake oven without my strips. I always keep a spare set. In the US they have big box craft stores that routinely sends out discount coupons via email. So when I start using my spares, I buy another set with my discount coupon. The cloth strips are an absolute must have items for me.

Yes, you can definitely connect them to wrap around a square tin. I’ve done it with good results.

You’re very welcome for the input. I love baking so of course I love talking about baking.

Hope your next Victoria sandwich comes out more to your liking. Happy baking.

Edit: I forgot to mention that the pan he is using in his video is an anodized aluminum pan. I’m positive that’s a Fat Daddio pan. See how nice and light his cake came out with the baking strip? So you can get a good result with anodized aluminum when you lower the oven temperature and used baking strips. The type of flour will also affect the color and texture. But pan, oven temperature, and baking strips are very important for a nice light color and moist cake.
 
Last edited:
Joined
Apr 1, 2019
Messages
209
Reaction score
173
Thanks, I'll do the DIY strips and try again in my tins before buying anything.

Regarding flour, interesting point.
I've been using run of the mill (no pun intended) self raising and plain/all purpose flour for all my bakes, these ones.

https://www.tesco.com/groceries/en-GB/products/254917828
https://www.tesco.com/groceries/en-GB/products/254917759

Sorry to keep picking your brain with all my questions but would it be a less dry sponge if I used a branded flour?

For the Victoria sponge, it asked for self raising flour plus 2 teaspoons of baking powder. What I don't understand is why self raising flour, which obviously already has a raising agent included, would need baking powder, and perhaps the baking powder contributes to drying the sponge. I know how to make cake flour by substituting some plain flour with a couple of tablespoons of cornflour, and wonder if cake flour plus baking powder would work better?
 
Joined
Jun 22, 2017
Messages
4,067
Reaction score
2,081
Thanks, I'll do the DIY strips and try again in my tins before buying anything.

Regarding flour, interesting point.
I've been using run of the mill (no pun intended) self raising and plain/all purpose flour for all my bakes, these ones.

https://www.tesco.com/groceries/en-GB/products/254917828
https://www.tesco.com/groceries/en-GB/products/254917759

Sorry to keep picking your brain with all my questions but would it be a less dry sponge if I used a branded flour?

For the Victoria sponge, it asked for self raising flour plus 2 teaspoons of baking powder. What I don't understand is why self raising flour, which obviously already has a raising agent included, would need baking powder, and perhaps the baking powder contributes to drying the sponge. I know how to make cake flour by substituting some plain flour with a couple of tablespoons of cornflour, and wonder if cake flour plus baking powder would work better?


No worries @Lee_C, if there is one topic I love to discuss, it's baking.

1. why both baking powder and self rising flour? I'm pretty sure that is Mary Berry's recipe. Her recipe uses both baking powder and self-rising flour because her original mixing method is all in one. That means all the ingredients are placed in the bowl, mixed and baked. With all in one, there is no mechanical leavening, which will results in a low rise. To create more rise, she added baking powder to the the self-rising flour.

So what is mechanical leavening? Creaming butter (or any solid fat) and sugar. Creaming butter and sugar is NOT about mixing your ingredients, it's about leavening. The sugar crystals cut through the fat. The longer you beat the butter and sugar, the more air pockets you create. Sugar is hygroscopic--meaning it attracts water from the environment. You see the affect of hygroscopic properties when you leave a piece of unwrapped hard candy on the counter. After some hours the unwrapped candy is sticky. That's the sugar pulling water from the air. Sugar does the same thing in your cake. So the butter has a bunch of air pockets. All that sugar is in there. You add you wet ingredients. The sugar starts to attract that water. The baking powder is activated the by moisture and acid and begins to make gas. Then you add heat from the oven. The water evaporates and creates steam. The steam and the gas from the baking powder create lift. So the baking powder and the mechanical leavening work together to create a nice rise.

Because Mary Berry's original did not use mechanical leavening for that extra help with rise, she doubled up on the chemical leavening--the baking powder.

2. Adding cornflour to make cake flour: no, adding cornflour to plain or self-rising flour does not create cake flour. The practice of adding cornflour to cake recipes dates back to 1896 and possible earlier. Refined flour (bran and germ removed) did not exist until the late 19th century. Flour was stone milled. So it was coarse and more suited for bread. Cake as we know it today, was nothing like the cake our great-grandmothers baked. in 1896, Fannie Merritt Farmer published a cookbook titled, "The Boston Cooking-School Cook Book". In subsequent editions the title would become the Fannie Farmer Cookbook. Fannie Farmer is the godmother of baking. The most significant contributions she made to baking (and cooking in general) was the use of standardized measuring cups and spoons. In addition, she used level measures, meaning the dry ingredients were leveled even with the top of the measuring cup and spoons. The other lesser known contribution she made was her approach to cake batter. She used a full 1/2 cup of cornflour mixed into 1 1/2 cups of that coarse stone milled flour to create a more softer crumb. This produced a cake markedly different from cake during that period. Fannie Farmer called this cake a Velvet Cake.

But in this day and age, we have refined flour. We do not need to mix cornflour to create a soft crumb. And it is a very bad idea to do so since cornflour is highly hygroscopic. Cornflour will suck up the water in you batter and create a gooey, dense cake.

The difference between cake flour and plain and self-rising flour is bleaching. When refined flour sits, over time it naturally bleaches. The bleaching weakens the protein structure. When used in cakes, muffins, and pastries, the weaker gluten structure makes for a softer and tender crumb. Flour mills cannot afford to wait for the flour to bleach naturally, they need to get their product to market as soon as possible. So they started bleaching flour by exposing it to chlorine gas or benzoyl peroxide. But bleaching has been banned in many countries. So bakers started mixing in cornflour with the flour, much like bakers did in Fannie Farmers day. But they do this without understanding why Farmer and her contemporaries used the mix of cornflour and flour. They don't understand that the addition of cornflour does not change the amount of gluten in flour, nor its structure. Plus, its hygroscopic properties introduces a whole set of problems. Cornflour certainly has a place in baking, but not in cake batters.

3. There is nothing wrong with the flours you use. Yes, there are a slew of flours, but few home bakers have access to the array of flours produced for the trade. What's important is using the right flour for the application. Sometimes that means mixing a plain flour with a bread flour. And as you are learning, understanding the science behind chemical reactions of ingredients and temperature, as well as the reasons behind the various mixing methods. The hallmark of a great baker isn't the use of most expensive and exclusive ingredients, but rather a baker who can create an extraordinary baked good from the constraints of local ingredients and their equipment and oven. We can get really caught up in the labels and brands, but even the best ingredients can be baked into a crappy dry cake when poor baking skills and knowledge is applied.

Years ago I read an article by chef Joyce Goldstein, a two time James Beard Foundation Award winner. She talked about how she yearned for a large state of the art home kitchen. How as a young chef living in Italy, her apartment and kitchen was so small she barely had room to turn around. When she became successful and opened her award winning restaurant in San Francisco, with its huge spacious kitchen, she realized that only worked in one small space in the kitchen. She really didn't need all that kitchen real estate to create a spectacular meal.

I've been fortunate enough to get hands on training with professional pastry chefs in commercial kitchens. Trust me when I say commercial kitchens are stocked with some pretty basic stables that are the same quality as the home cooks buy in local grocery stores. And those expensive all-clad cookware in the high end retail stores---well, you won't see that stuff in a commercial kitchen. Yes there are some awe-inspiring speciality tools and equipment, but the basic bakeware is as basic as it comes.

@Lee_C, you are doing things right---you're reading and following instructions; you're analyzing your results; you're asking questions as to why things turned out the way they did; you're asking how to get a different result. But most important of all, you are enjoying the baking. You are living life well--it doesn't get any better than that my friend:D
 
Joined
Apr 1, 2019
Messages
209
Reaction score
173
Thank you norcalbaker, extremely interesting and informative as always. ;)

Yes, I'm one for being very self critical and over analysing things, but it's a double edged sword. Sometimes it works against me, i.e, I'm guilty of going overboard and worrying about things too much. But mostly I think it's an advantage because attention to the smallest details, particularly as I'm discovering with baking, can be the difference between not bad, good and excellent. Yep, definitely enjoying the process of baking! :)
 

Ask a Question

Want to reply to this thread or ask your own question?

You'll need to choose a username for the site, which only take a couple of moments. After that, you can post your question and our members will help you out.

Ask a Question

Members online

No members online now.

Forum statistics

Threads
6,551
Messages
47,256
Members
5,503
Latest member
am123

Latest Threads

Top