This is a very very long post. Bread contains the fewest ingredients, but it is the most difficult to bake. There are some fundamentals that absolutely must be applied for a successful bread. The type of flour, type of yeast and how it’s added, how you measure ingredients are very important.
I calculated the bakers percentages. The hydration level is 65%, which is the standard for a bread of this type. The other ingredients are all within the standard ratios.
FLOUR
Use King Arthur all purpose flour or a flour labeled “Bread Flour”. These flours have a higher protein content.
All baked goods are held together by a gluten network. The amount of gluten needed depends on the end product. For example, bread requires more gluten development than a cake.
Gluten development is directly related to the protein content of the flour. A difference in protein by 1 to 2% will have a significant difference on the performance of the flour.
Protein content varies by brand since different brands use different varieties of wheat. Flour treatment also effects protein content. Bleached flour will have a lower protein content than unbleached flour.
Bread dough quality is greatly improved with a flour protein content of 11.5% or higher. The Publix all purpose bleached flour has a protein content of about 10%. This is great for cupcakes, but not good for bread. By comparison King Arthur all purpose flour has a protein content of 11.7%. Flours labeled “bread flour” have a protein content of 12% or higher.
YEAST
The recipe calls for Active Dry yeast. Active dry yeast has much larger granules then instant yeast so it should be rehydrated before mixing.
The temperature of the liquid is very important as yeast is a living organism. If the water is too hot, it will kill the yeast. If the water is too cold, it slow the development of the yeast.
Use an instant read thermometer to check the temperature of your liquid. Ideally the liquid should be 95° – 110°.
YEAST REHYDRATION
A lot of recipes instruct mixing the yeast in with all the other dry ingredients. However the performance of active dry yeast is improved when yeast is properly rehydrated. Aside from dissolving the yeast rehydrating the yeast provides evidence that it is alive. So rehydration is often referred to as proofing the yeast.
Warm your water to 95° – 110°. Add the sugar and stir until dissolved. Sprinkle the yeast in a thin even layer over the water. Do not stir. Let sit for about 10 minutes. The yeast will dissolve and develop into a foamy layer on top of the water. At that point you can begin mixing your dough.
YEAST TYPE
Red Star markets a yeast labeled Red Star Platinum Superior baking yeast. It’s pure yeast blended with enzymes that commercial bakeries routinely use to improve dough quality. The enzymes make for a more forgivable dough. The enzymes counter some of the negative effects of dough what is under/over proofed. This is a good yeast to use while learning how to bake bread.
Red star platinum is available in restaurant supply stores or online. Unfortunately grocery stores rarely carry it.
This is the online source taken from Red Stars website. While Red Star platinum is available through Amazon and other sources, improper storage and slow inventory turnover rate may result in yeast that is already dead or close to if not at its expiration date.
http://www.onlinegroceryoutlet.com/platinum-superior-baking-yeast-3-ct.html
MEASURING
If you do not have a food scale, use the following method to ensure better accuracy in measuring ingredients.
Dry Volume Measurement Flour*
- with a fork or small whisk stir to aerate flour
- spoon flour into measuring cup, fill above rim
- do NOT pack flour into cup
- level flour even with rim using a butter knife
Dry Volume Measuring Cup
This is a dry volume measuring cup. Do
NOT use this type of cup to measure liquid.
Liquid Volume Measurement
- fill cup
- place cup on level surface
- get eye level with cup check liquid level to ensue the liquid is actually at the correct line.
Liquid Volume Measuring cup
This is a liquid volume measuring cup. Do
NOT use this type of cup to measure dry ingredients.
*
NOTE: There’s two methods used for dry volume measurements.
-spoon and level: 1 cup = approximately 120 g = 4 1/4 oz
-dip and level: 1 cup = approximately 140 g = 5 oz
As you can see there is a significant difference in the amount of flour depending on the volume method used. This is the reason volume measurement is never used in a commercial kitchen.
I do not know the volume method the recipe developer used for this recipe. I’m advising the spoon and level method because the hydration level comes out to 65% when the water and flour is converted to metric weight. That hydration level is consistent for this type of bread.
PROOFING
Most recipe instruct proofing dough until “doubled in size” or for a certain period of. These are completely unreliable methods to proof dough. Time and dough volume are not indications of ideal yeast development. Under/over proof dough is the most common cause of bread failure, so determining proper fermentation is very important.
Using the oven to proof dough
- Set up the oven at least 20 minutes before using
- Before you begin mixing your dough, turn oven on for 90 seconds, then turn it off. It’s important not to heat longer than 90 seconds.
- Turn on oven light and leave it on. The 40 watt bulb will keep the oven warm
- Place a shallow pan with 1” of boiling water on oven floor and close the door.
- Before placing dough in off oven, fully open the door for 1 minute to allow some steam to dissipate
- Place a probe thermometer or an instant read thermometer in the oven on a cookie sheet to monitor the oven temperature. Ideal temperature for proofing is 80°F.
Properly proofed dough: 1st RISE
- “double in size” is NOT the test for properly proofed dough
- To test dough, lightly flour index finger and gently poke into dough up to the first knuckle, then gently remove it.
- Under-proofed: indentation disappears completely
- Over- proofed: indentation remains in dough
- Properly proofed: indentation slowly begins to fills and leaves a depression about half the size you created
Proofed dough: 2nd RISE
Time and size are NOT indicators of properly proofed dough. Since both an over proved and a properly proofed dough will hold an indentation, you must feel for resistance to determine when the dough is ready to bake. A properly proofed dough should feel tender yet slightly resist when pressed, and just hold an imprint.
- Under-proofed: feels firm, indentation disappears completely
- Over- proofed: feels very squishy, indentation remains in dough
- Properly proofed: tender with some resistance, slight indentation remains in dough
http://videos.sorensonmedia.com/San...mparison/07b87e60Ncb2cy471eC9a69Gc89e41d4aa10
KNEADING
Proper technique: almost all the videos I’ve ever seen on the Internet demonstrate improper kneading technique.
The proper technique for kneading is:
- pat gently to flatten some
- fold in half toward you
- with heel of hands, GENTLY roll away from you. Do not press down on the dough. Aggressive handling will cause too much gluten development.
- quarter turn
- repeat the pat, fold, GENTLE roll, quarter turn
This video demonstrate the proper technique.
How to tell when dough is kneaded enough:
Under-kneaded
- looks rough
- loose and tears easily
- pick up the dough in the palm of your hand; dough that has not been kneaded enough will quickly spread out into a floppy mass over your hand
Properly kneaded
- looks smooth
- gently press on the dough, The dough will feel somewhat firm and spring back when you lift your finger
- pick up the dough in palm of hand, dough will slowly spread out
- soft and pliable
- stretches into a thin sheet before it finally tears
Properly kneaded
- looks smooth
- dense and very firm
- pick up the dough in palm of hand, dough will barely spread out
- tears very easily as too much gluten will not give
It’s better to slightly under knead than it is to over knead since shaping the deal will promote more gluten development. But there is no way to reverse the gluten development in Duro that has been over kneaded.
SHAPING
Flour: it is important to minimize the amount of flour used during shaping. The work surface should be very lightly floured. It is better to flour your hands, than over flour the work surface.
When rolling the dough into logs for braiding roll very gently with light pressure. If you use a lot of pressure you will tear the skin on the dough, exposing the sticky interior. The dough will then stick to the counter and your hands. You’ll end up countering that stickiness by throwing down more flour. And a vicious cycle of tear, stick, flour begins.
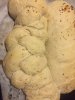
Braiding: it is best to begin the braid in the center. Braid from the center to one end, then turn the loaf 180°. Then complete the braiding on the opposite side. Braiding from the center will give you a softer loser braid that will not inhibit rise during baking.
During braiding it is important that you not stretch the dough. Stretching will tear the outer skin exposing the sticky interior. That sticky interior will stick to the other dough strands, which will then fuse everything very tightly during baking. It will inhibit the rise and distort the shape of the bread.
 D4445C85-E499-4191-915D-32B7D0E0979B.jpeg101 KB · Views: 465