- Joined
- Jun 22, 2017
- Messages
- 4,067
- Reaction score
- 2,081
“Eggs are as variable as er... eggs.”
ain’t the the truth!!!!
ain’t the the truth!!!!
If you don't mind then I'd appreciate the recipe!Oh wow, I guess I should stop complaining about the flour situation here. I have access to a lot of flours, yet I still complain that its not enough. I’m such an ingrate.
I agree that given your limited access to flour, it may be blend flours. And maybe increase your hydration a bit. I have a recipe that is pretty close to your ratios, just slightly higher. It’s not mine, but developed by a professional baker. I made some minor changes to the mixing, nothing major. If you like I can pass it on to you. Let me know.
That article was odd...its factually wrong on so many points.
If you don't mind then I'd appreciate the recipe!
Made another batch today, this time blending flours to approximate 11% protein, made sure the water was at a full boil before adding flour to ensure no lumps, and had a full very long preheat. I also added an extra 20% eggs in the form of leftover egg whites to the choux paste since it still could've used more hydration, and even then I could've added more (still wasn't glossy, and didn't quite pass the "V" or streaking a finger through tests), but decided to see how it went as-is.
I wasn't able to monitor the baking for the entire time, but was able to check periodically. I noticed that after 15 minutes in the oven, they still held on to their shapes well with no cracks. However when I checked again after 30 or 35 minutes, the same cracks had developed in the sides. That makes sense with what retired baker side about the side blowouts happening in the later part of the bake... as I don't think I can control the vents in my oven, maybe the best way to control the moisture then is just opening the door? I know you've recommended against doing so, but I'm just wondering whether having a pan of water in the oven will also contribute to too much moisture later, resulting in the same side cracks. Maybe it's too much aeration too? Since I'm using a hand mixer, the beaters as opposed to a paddle attachment are likely incorporating much more air than people using stand mixers.
Also ended up baking for a total of 50 instead of 40 minutes, and got a much nicer darker colour this time.
")
I've made the recipe a couple times now, and it was definitely an improvement over before, but some side cracks were still present. The recipe's pretty similar to what I was doing before, but the major changes have been:@Cahoot, I sent you the recipe.
I've made the recipe a couple times now, and it was definitely an improvement over before, but some side cracks were still present. The recipe's pretty similar to what I was doing before, but the major changes have been:
I tried baking at the as-written temperature of 375°F for 40 minutes, as well as 350°F for 50 minutes, and I got smaller cracks with the lower temperature. So as of now, those cracks aren't huge splits in the sides like my previous pictures, and some were barely even noticeable which I'm very happy about, but I'm on a mission to eliminate them entirely, if possible. I was able to monitor the choux more closely in the oven, and the cracks only start to appear after about 20-25 minutes.
- Slightly increased hydration
- Used greased and floured sheet instead of lining with parchment
- I also finally got my stand mixer delivered, so I was able to mix with that instead of using my hand mixer.
How would you consider proceeding from here? Since the issue is supposed to be too much moisture in the later part of the bake, I'm not sure if I should mess around with the hydration from the water/milk/eggs. Personally, I think I could give a pan of water in the oven a try, and/or maybe lower the protein in the flour by a percentage. The recipe mentions having vents open after 20 minutes, but unfortunately that's not an option for me - I'd guess that it would help quite a lot with this problem if it was!
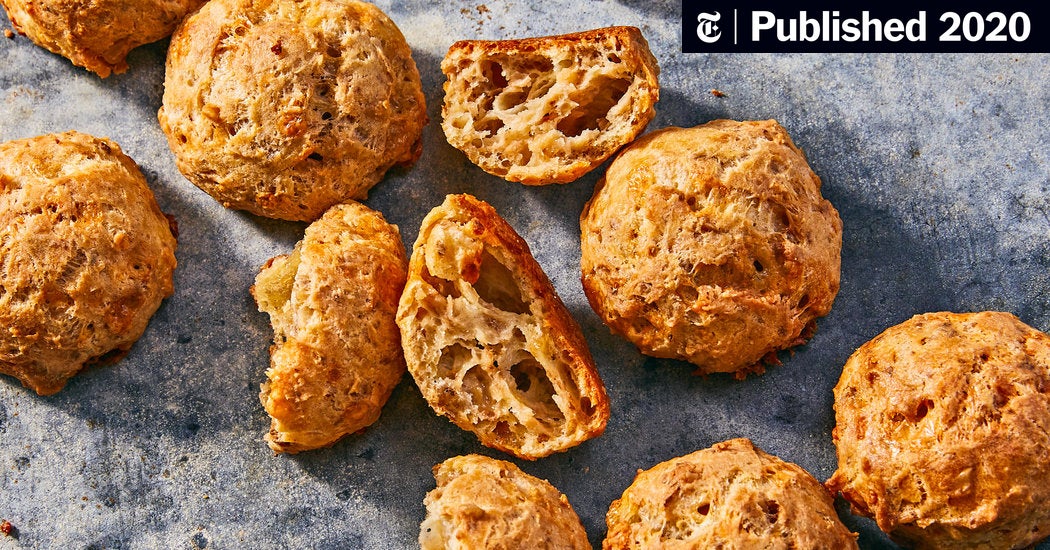
Thanks for linking the article, it was a great read@Cahoot, since you are working on pate a choux, I thought you might enjoy this article by Dorie Greenspan
Baking During Quarantine as an Act of Faith (Published 2020)
I always have a batch or two of French cheese puffs in the freezer, even if it might be a while until I have friends over.www.nytimes.com
. I've always wanted to make gougères, but I'm afraid that if I did, I wouldn't be able to stop eating them!Thanks for linking the article, it was a great read
I've been spamming this thread a lot, but to give an update on the éclair situation, I did another couple tests with water in a pan and those have been the best results yet. I tried using only 80 ml water to start with, then another batch with 120 ml, though there wasn't a noticeable difference. While side cracks still aren't completely eliminated, they're even smaller now. As they say, "perfect is the enemy of good", and I'm happy with what I've got, so time to take a break from testing (and my freezer only has so much space haha).
On another note, they're technically made from pâte à choux, so I thought I'd share the churros I made yesterday. My brother and I had these amazing guava-filled churros at a place from LA when we visited last summer, and I was finally able to recreate them. And similarly with éclairs, they're a blank canvas for flavours as fillings, toppings, or dippings!
View attachment 2873
Thank you! It's hard to overstate how much I appreciate your advice and encouragement@Cahoot OMG! Those look so amazing! You nailed it!!! The plate is really cool too. I’m glad the water seems to help. pate a choux is project. It took me a dozen tries and adjustments to get it down. No one gets it the first time. It’s an effort. But these say you did it. High Five!!
It was a guava filling made from guava paste thinned with guava nectar. Had to make a trip to a Latin grocery store (before the social distancing) just to get the paste, but it was definitely worth it as you can't really find that flavouring anywhere else around here.Oh I almost forgot—What did you fill them with????
Thank you! It's hard to overstate how much I appreciate your advice and encouragement
It was a guava filling made from guava paste thinned with guava nectar. Had to make a trip to a Latin grocery store (before the social distancing) just to get the paste, but it was definitely worth it as you can't really find that flavouring anywhere else around here.
Your friends and family will be so lucky when you send them these! Some other filling flavours I remember were the classic chocolate, dulce de leche, strawberry, condensed milk, and cheesecake. We have some cans of sweetened condensed milk lying around in the pantry, so I was tempted to also make some dulce de leche and have a spread of multiple flavours, but ultimately it wouldn't have been worth it just for our family. Would be fun if serving a large group though. I'd like to see what you come up with when you get around to making them!That sounds really Delicious. I’ve never seen stuffed churros. I really like that idea. when we get off lock down I am going to have to give it a try. I can’t eat gluten, so everything I bake has to go to family or friends.
. I saw a technique of spraying éclair shells with a neutral oil before baking to help prevent cracks, so decided to try it out, and managed to actually get some pretty good results. Excuse the curved éclair at the front lol, I didn't even notice it being curved before putting it in the oven. Time to visit pâte à choux once again
I sprayed one half of the shells with nonstick spray then dusted with powdered sugar, and the other half just got the nonstick spray, no powdered sugar dusting. You can see that the ones that didn't have any powdered sugar dusting were too pale, and interestingly also had more cracks. The ones that did get dusted with powdered sugar had much fewer cracks, albeit some still were. But the majority having no or very small cracks beats all of them having blowouts on the sides!
I experimented with a slightly different baking/drying temperature and time for this batch, and unfortunately they weren't dried enough and some did collapse a bit. But nonetheless happy with the results. If anyone else is having issues with cracks in the sides of their éclair shells, maybe try this technique of coating them with a fat. I've also seen clarified butter, cocoa butter, and deodorized coconut oil used instead.
View attachment 3291
View attachment 3290
I did a test before I found out about the oil coating technique, changing from greased + floured pan to silicone mat, but it didn't make any significant difference. I haven't had a change to test silicone vs. parchment with the oil coating but I've seen most people use silicone anyway. Or more specifically Silpain is preferred, but no way I'm shelling out the money for that right now lol.Those look really good @Cahoot! I would have never guessed that a light coating of oil and some powdered sugar would stop cracking. What temperature did you bake? I see you are baking on a silicone mat now. I think that the surface you bake on makes a difference too.
Want to reply to this thread or ask your own question?
You'll need to choose a username for the site, which only take a couple of moments. After that, you can post your question and our members will help you out.