I’m going to start with the fundamentals:
Structure:
Notice how your cake is bulging on the sides? The sides are not straight because the cake layers are not level. Most likely the layers baked domed. If you leveled the cake layers, then the cake was not properly assembled before it was decorated.
Bulging sides can also be an indication of filling oozing out between the cake layers and and buttercream if the layers were not properly damed. It can also be an indication of the gas in the cake being pushed out. Cake has leavening in it. When a cake is stacked, The weight of the cake will force the air out. The air will take the path of least resistance. And that is usually in between the layers. And that can be a particular problem when there is filling in a cake. So it’s always a concern when the sides of a cake bulge. So as a general rule a cake is baked at least 24 hours before it is decorated. That gives the cake time for the crumb to settle. If the cake is going to be covered in fondant, it absolutely needs to be degassed after it’s filled and stacked, but before it’s covered in fondant. I’ll put a link below on how to degas a cake.
But getting back to baking a level cake... A domed cake is an improperly baked cake. The sides of a domed cake will be lower than the center of the cake. And even if the dome is cut off and cake layer is flipped over to make the cake usable in a layer cake, you still have a distorted cake With one side of the cake lower than the other. Aside from the aesthetic problems, a domed cake is dry, over-browned, and crusty cake. That’s why bakers drench the cake in simple syrup, another attempt to make inedible cake more palatable.
Assuming the recipe is good, if you bake your cake at 325°F and use Wilton cloth baking strips the cake will bake level and will not be dry and crusty.
You can make your own baking strips if with paper towels and aluminum foil if you don’t bake a lot of cake. The link below is to a thread with a video link on how to make a baking strip. I also posted photos of cake layers so you can see how level with cloth strips.
Also if you are using anodized aluminum or dark metal pans you should be baking at lower temperatures anyway. These types of metals conduct heat much more intensely. I only use uncoated metal pans for cake, as do most event cake bakers do. Anodized aluminum and dark metal pans over brown and over bake cake. On the thread below I posted a photo of two cake layers baked in two different pans. Same batter, baked at the same time, in the same oven, only difference was the pan.
So it’s important to start with a well baked cake layer.
Link to thread on cloth baking strips and baking level cakes
https://www.baking-forums.com/threads/victoria-sponge-sandwich.5438/
Assembly:
A well decorated cake begins with the well assembled cake.
- Even level cake layers
- Even piped dam 1/2”
- Even layer filling 1/2”
- Even 1/2” layer of buttercream on cake
- Check cake with a level
- Check that sides the sides are straight
I use acrylic cake circle guides to apply an even layer of buttercream around my cake. But I use paper cake circles for years. The video link below will demonstrate how to do it. Just substitute paper cake circles for the acrylic circles.
link to how to use acrylic cake circle guides. Just an aside, notice the poor quality of her cakes. She thinks because it’s covered in icing the quality of the cake doesn’t matter. So many American bakers have that same attitude. Trust me, what’s covered in icing truly matters. How the cake tastes and how it looks plated matters.
Start with a level cake
1/2” dam
Align sides. Use cake circle to ensure even layer of icing
Cake circles ensure even coating of buttercream, straight sides, eliminates the crumb coating step
The sides are straight, now make sure the cake is level. You don’t need the acrylic cake circles, you can do the same thing with the paper cake circles, If you take these extra steps your cake will look more professional.
Here’s the finished test cake from above. No one actually ate this cake. I was developing a cake recipe for an upcoming party. But I still make an effort to do things properly even when testing.
Buttercream smoothness:
Looks like you have a lot of air bubbles, which happens to everyone when they make buttercream or any icing.
So use the paddle attachment to knock out the air bubbles. If the mixer bowl is filled with enough buttercream to cover the holes of the paddle it will force the air bubbles out.
Make 2 or 3 batches buttercream. Fill mixer bowl so the buttercream is just ABOVE top of paddle; the paddle should be submerged in buttercream so that whole triangular part is submerged right up the to neck. Mix at lowest speed for 1 to 2 minutes. Check to see if buttercream free of air bubbles. Mix a little bit more as needed. Transfer to a bowl and repeat with the remaining buttercream.
Whitening butter based buttercream. I don’t know if you’re using a real meringue buttercream, butter and powder sugar icing or shortening and powdered sugar icing.
But if you are using an actual butter based icing, then the brand of butter makes a difference. Some premium brands of butter are more yellow. I prefer Plugra. It’s a quality butter and it’s not too yellow.
If you are using a butter and powdered sugar icing, then change the mixing method slightly.
Start with butter that’s about 65°F. Cut it into large cubes. With the paddle attachment beat it for about 2 1/2 minutes. You’ll notice the color of the butter is going to go from yellow to very pale yellow. Scrape down the sides and bottom of the bowl. Beat for 2 1/2 minute.
Then add the sifted powdered sugar in additions.
Then you can cancel out the yellow using a bit of violet food color gel
Link on whitening butter-based buttercream with violet color food gel
But you need this specific color and this specific brand of food gel color. Other brands will turn the buttercream gray. Yes, we all tried other brands thinking gel color is gel color. Nope. Get this brand. It’s a European brand so you have to order it through Amazon. You can’t buy it at Michael’s or JoAnns.
https://www.amazon.com/Sugarflair-Spectral-Concentrated-Paste-Colouring/dp/B009BQNIEY
Technique.
It looks like you used a cake comb on your cake. Which is fine there’s nothing wrong with cake combs.
But the design on the cake in the Pinterest photo was freehand using the end of a spatula.
Your cake needs to be
Level
Side straight
Iced with a layer of icing at least 1/2”
Should not be a crusting icing
Link below on how to create spatula design. The Wilton cake is poorly iced, with lowest of quality icing, so quality of the work reflects that. But the technique used is the same technique used to make the design on the Pinterest cake
The larger and taller the cake tier the larger the spatula to use. So for a 12” tier don’t use the tiny spatula as the line will be too narrow.
Other thoughts..,
Prepare an emergency repair kit. You should include a disposable gloves, little spatula, extra buttercream, a couple of flowers or other decorations to cover up a minor damage that might occur in transit
Contacted the venue ahead of the event to find out when the cake should be delivered. Confirm that there is refrigerated storage if this is an outdoor reception. If there is no refrigeration you need to have a plan because cake and heat equals disaster.
How to cut a wedding/event cake. Caters know how to slice event cakes. But always including a chart and note the number of servings you expect.
https://www.wilton.com/wedding-cake-cutting-guide.html
How to wash and prep flowers for cake decorations. The flower stems have to be covered you cannot stick the stems directly into cake.
http://www.deliciouslyyours.com.au/baked---your-diy-blog/how-to-insert-fresh-flowers-into-a-cake
How to de-gas a cake
How to make an insulated cake box
https://avaloncakesschool.com/delivery-box/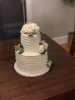 D244DCDB-CAB6-4233-9288-9C3D76BBF04F.jpeg86.5 KB · Views: 225
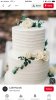 8FBAB4CA-A53B-4444-8A50-5BD628BD739F.jpeg70.9 KB · Views: 274
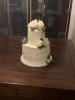 4A267B92-5B12-46DD-BE7A-BE7B565526C8.jpeg97.7 KB · Views: 250